Difference between revisions of "Cyvern: The Dragon Weapons"
m (Undo revision 28508 by JSAV2006STG(ABC) (talk)) Tag: Undo |
|||
| Line 112: | Line 112: | ||
=== "Death explosion" === | === "Death explosion" === | ||
| − | When you die, a bomb-like explosion occurs. Seems less powerful than an actual bomb but it can be use as a weapon. | + | When you die, a bomb-like explosion occurs. Seems less powerful than an actual bomb but it can be use as a weapon. Beware : '''this attack doesn't give any points''' ! |
== Items == | == Items == | ||
Revision as of 06:32, 23 March 2024
Cyvern: The Dragon Weapons
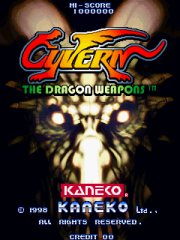
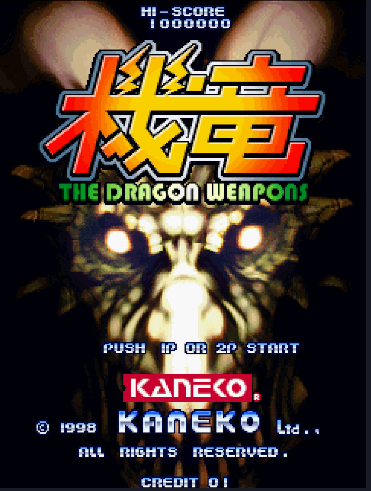
サイヴァーンTitle screen
| Developer: | Kaneko |
|---|---|
| Director: | A.Kaneko Tanaka Takayuki "Tony" |
| Music: | Katsuya Yoneda |
| Program: | K.Minegishi Hiyorinn.S Sho-Chan Osapan |
| Art: | U-Zool Hiroki Narisawa Endo Chang Ryo.Kimura Ishi-Ryu Gomez Marukeni |
| Release date: | 1998 |
Cyvern: The Dragon Weapons (サイヴァーン) is a vertically scrolling shoot'em up game developed by Kaneko and released in 1998 on Kaneko Super Nova System. It has not been released on any other hardwares.
Game has 5 stages and 2 loops.
The scoring system is very simple to understand, but the interest and difficulty of the game lies in managing rank and a special weapon called banish.
For replay videos, visit the Video Index.
Contents
- 1 Controls
- 2 Characters
- 3 Hitbox
- 4 Weapons
- 5 Items
- 6 Rank
- 7 Extends
- 8 Loops
- 9 Scoring
- 10 Strategy
- 10.1 Don't be fooled by the difficulty curve
- 10.2 Banish management
- 10.3 Rank control
- 10.4 Choose your boss
- 10.5 Don't neglect scoring, even when you're just starting out
- 10.6 Beware of timeouts
- 10.7 Watch your back
- 10.8 Use all your resources
- 10.9 Adapt yourself
- 10.10 Tips for second loop (survival)
- 11 Version differences
- 12 Cyvern Plus
- 13 Gallery
- 14 References & Contributors
Controls
- A (Tap): Shot
- A (Hold): Special Weapon ("banish")
- B: Bomb.
- C: You will not find a C button on service menu but, we quote TOS (check video index, NRK Schwarz video), there is a possibility of C button for PCB players : "No special settings, C button is by default of JAMMA. It's just not written in the manual. The C button fires only one shot. Add synchronous rapid fire to this C button, it will fire faster than the A button rapid fire. According to the developer at the time, the buttons used for debugging remained in the product". It could be useful for scoring and refilling the banish gauge quickier. For ex., you can see NRK using this "single-shot" C button on his 26.8M Replay (timestamp 18:58)
Characters
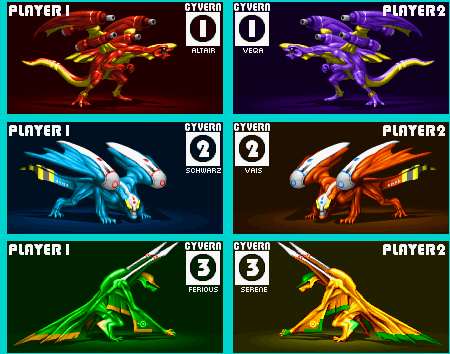
There are three playable dragons. Depending on whether you play as player 1 or 2, name and color of the dragons change but not their speed and weapons. Schwarz/Vais is the slowest dragon but it's hard to say which one is the fastest between Altair/Veqa and Ferious/Serene.
1. Red Altair (1P) / Purple Veqa (2P) : shot with homing lasers, banish = flames
2. Blue Schwarz (1P) / Orange Vais (2P) : wide shot, banish = lightning bolts
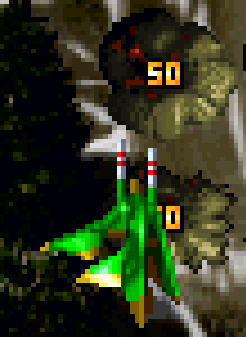
3. Green Ferious (1P) / Yellow Serene (2P) : narrow shot with rockets on the sides, banish = focused laser beam
Hitbox
The dragon's hitbox is very small but difficult to determine precisely. It seems thin and rather elongated, running along the spine but not reaching the head or tail. It seems to vary with movement, and bullets sometimes clip through it. You also need to take into account the various hitboxes of enemy bullets. Killing yourself on a small round bullet can be very tedious.
Weapons
Each dragon has three weapons: a shot, the special weapon "banish" and a bomb. The bomb is identical for all three dragons.
Shot
Use it to destroy popcorn enemies and refill the banish gauge (especially on strong enemies). When you reach a high power level, shot has additional elements depending on the character: homing lasers for Altair/Veqa, additionnal shots for Schwarz/Vais, rockets for Ferious/Serene.
There are five main levels of shot power. It takes two single powerups to increase a level, so one large powerup (= 4 singles) increases two levels at once.
For ex., with Ferious :
| Powerups | Shot |
|---|---|
| 0 | No rocket |
| 2 | No rocket |
| 4 | 2 rockets |
| 6 | 4 rockets |
| 8 | 6 rockets |
Special weapon "banish"
Use it to score and destroy multiple or strong enemies. It also protects you from direct impact with a flying enemy. The use of the special weapons empties the "banish" gauge. When it is empty, the special weapon is completely inoperative. To fill up the gauge you must shoot enemies with the shot, pick up powerups or die (dragon respawns with a full banish gauge and two bombs).
The special weapon is very different from a dragon to another and modifies therefore the gameplay and difficulty.
Altair / Veqa = flames. Banish DPS feels quite low and has a short range. Shot has homing elements that will cost you a lot of medals. Hardest dragon to master.
Shwarz / Vais = lightning bolts. Low DPS but covering a large part of the screen. Great screen control and useful to quickly reveal medals but you might struggle against bosses, even if you can focus your power by point-blanking enemies.
Ferious / Serene = high DPS laser beam that shoots straight forward and slants to the right or to the left depending on the direction you take. This is the World & Western record dragon because of the precision and power of the laser.
Bomb
Explodes mid-screen in front of you. Use it to destroy enemies, cancel bullets, lower the rank and get some invincibility frames.
"Death explosion"
When you die, a bomb-like explosion occurs. Seems less powerful than an actual bomb but it can be use as a weapon. Beware : this attack doesn't give any points !
Items
Items have pretty big hitboxes, larger than the sprite itself: it can be useful (or not, if you want to save them for later). After a while, items leave the screen.
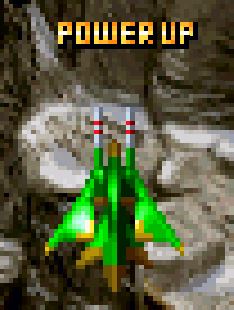
Big powerup : equivalent to 4 small powerups. It strongly fills the banish gauge and increases firepower by two full levels.
Small powerup : equivalent to a quarter of a big powerup. It slightly fills the banish gauge and increases the firepower.
Bomb: bomb is a bomb, no fragment or weird stuff.
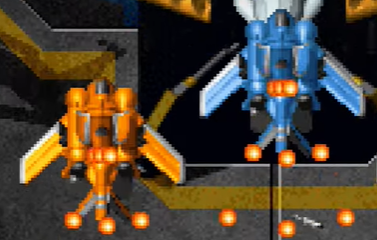
Powerups and bombs are usually dropped by a certain type of ships, orange for powerups and blue for bombs. Get a big powerup by quickly destroying orange ships, otherwise you'll get only 2 small powerups.
You can also get those items by destroying parts of bosses or dying.
Rank
Game has a rank system depending on how many extends, bombs and powerups you got. Other factors may also come into play here, since rank can sometimes rise for no visible reason. Managing the rank is crucial for the score: see strategy sections for details.
Rank and bosses
Depending on the rank level, you'll fight different versions of bosses on stage 1 and 2. In general, every bosses are harder when rank level is high. See strategy section for details.
boss 1
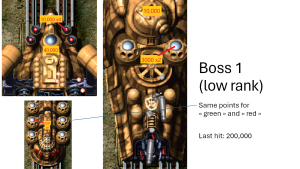
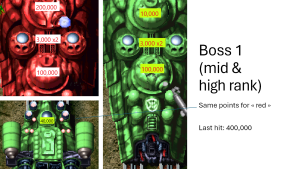
Boss 1 can be brown, green or red. Brown is easy but won't give a lot of points. Green is moderately difficult but is the one that gives the most points. Red is the hardest, it gives more points than the brown but less than the green. You can't meet Red on first loop.
boss 2
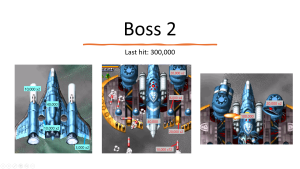
Boss 2 can be grey or red. Red is harder but won't give you more points than the grey, unless you trigger extra "claws" attacks at very high rank (2 claws : 60,000 pts each).
You'll fight it again as a mid-boss in stage 5, in grey color but with "red" attacks & much less HP. Same score expected (ca. 1,300,000).
Extends
You earn an extend every million points. There is no other hidden extend.
Loops
Game has a second loop you enter by just finishing the first one, even with continues. No requirement needed and no TLB (for the Original version). Second loop is quite identical to the first one but with a very high rank: more and faster bullets, more resistant enemies. No revenge bullets though.
Stage 4, boss included, is clearly the hardest one but you will get a lot of extends during stage 5 (which is easier) to recover and get ready for second loop.
Scoring
Scoring is based on two main elements: bosses (ca. 50%) and medals (ca. 30%).
"Banish" is the key to get points: using shot or bomb won't give you any bonus points. In general, "banishing" enemies and bosses parts will give you about twice as many points as destroying them with shot or bomb. A few large enemies are worth thousands of points (buildings, big tanks...).
Here's a table to estimate the theoretical maximum points available in the game. Remember that the world record is set at 29.8 million, i.e. almost the maximum possible.
| Stage | Total | Splits | Boss & mid-boss | Medals | 100k medals | Others (with banish) |
|---|---|---|---|---|---|---|
| Stage 1 | 2,200,000 | 1,600,000 | 500,000 | 0 | 100,000 | |
| stage 2 | 2,050,000 | 4,250,000 | 1,300,000 | 250,000 | 100,000 | 400,000 |
| stage 3 | 2,050,000 | 6,300,000 | 600,000 | 900,000 | 100,000 | 450,000 |
| stage 4 | 3,900,000 | 10,200,000 | 1,400,000 | 1,950,000 | 100,000 | 450,000 |
| stage 5 | 5,500,000 | 3,300,000 | 1,200,000 | 200,000 | 800,000 | |
| Total | 15,700,000 | 8,200,000 | 4,800,000 | 500,000 | 2,200,000 |
Medals
Build the chain
Game has a medal system. You must build a chain of medals in 6 steps: 50 points, 100, 500, 1 000, 5 000, 10 000.
Destroy a ground enemy (tanks, buildings etc.) with the "banish" to reveal a medal. You must collect at least 5 medals to advance to the next value. If you reveal more than 5 medals at the same time, they will all have the same value. So, ideally, you want to reveal 5 medals, collect them, then reveal 5 more, collect etc.
The very beginning of stage 1 shows you the way: destroy 5 tanks, collect, then destroy the 5 others.
If at least one medal goes off screen, even when you're dying/respawning, chain is broken and you restart from the very bottom (50 points medal). There is no way to recover more quickly. Beware: playing area is larger than the screen so a medal can be hidden on one side. It can also be hidden behind a new wave of enemies.
Even if you rebuild perfectly the chain 5 by 5, it's a 216 750 points loss at the very least.
Hitbox
Medal's hitbox is quite large so pay attention to the notification sound, you may have caught that medal that seemed off-screen
Medal count
It's almost impossible to collect (and count) all the medals, but the theoretical points total is approximately 4,800,000
| Stage | Medals |
|---|---|
| stage 1 | 50 |
| stage 2 | 25 |
| stage 3 | 90 |
| stage 4 | 195 |
| stage 5 | 120 |
| Total | 480 |
100 000 points medals
Five 100 000 points medals are hidden throughout the stages. To get these, it is necessary to destroy (with the "banish" as always) some enemies in a particular order and collect the medal. A special sound will notify you of the collection.
Stage 2 : In the first section of the stage, two big planes are rolling. Destroy the one on the left first, then the one on the right.
Stage 3 : After the cloud of flying insects, two big bio-mechanical tanks appear. Destroy the one on the right first, then the one on the left.
Stage 4 : you'll fight a mid-boss composed of a core and 4 turrets. Destroy the 4 turrets first (60k pts each) then the core (100k pts), all using "banish".
Stage 5 : just before the mid-boss, three big tanks appear side by side, destroy first the ones on the sides, in any order, then the middle one last.
Stage 5 : right after the mid-boss, you'll meet again the two bio-mechanical tanks from stage 3. Same strategy: destroy the one on the right first, then the one on the left.
Bosses
Last hit
Get a big bonus by giving the last hit to bosses with the "banish" (except stage 3). If you shot or bomb, you'll get half the points. Bosses have no lifebar and the time to destroy them is limited. When timeout music starts, you're invincible and can still hit the boss.
Destroy piece by piece
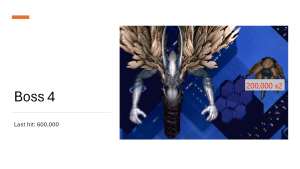
Bosses are composed of many parts that must be destroyed one by one with the banish in order to obtain bonuses that can range from a few thousand to several hundred thousand points. As for the last hit, you will only get half the points if you don't use the banish. Boss 4 is accompanied by two flying monsters that are worth 200 000 points each.
Leeching
Some bosses launch blue bullets that can be cancelled, especially "green" boss on stage 1 but also stages 2 & 3, until the time runs out. Boss launches destructible missiles (stage 2 : 72 missiles, 10,000 points each).
Estimated score per boss
The total for a run including the green boss is around 8,200,000 points.
| Boss | Parts + Leeching | Last hit | Total |
|---|---|---|---|
| Boss 1 (brown) | 100,000 | 200,000 | 300,000 |
| Boss 1 (green) | 1,200,000 | 400,000 | 1,600,000 |
| Boss 1 (red) | 470,000 | 400,000 | 870,000 |
| Boss 2 | 1,000,000 | 300,000 | 1,300,000 |
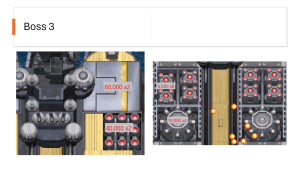
| Boss 3 | 600,000 | 600,000 | |
| Mid-boss 4 | 300,000 | 100,000 | 400,000 |
| Boss 4 | 400,000 | 600,000 | 1,000,000 |
| Mid-boss 5 | 1,000,000 | 300,000 | 1,300,000 |
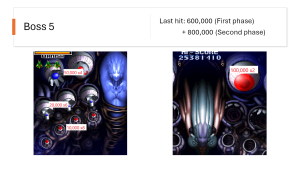
| Boss 5-1 | 400,000 | 600,000 | 1,000,000 |
| Boss 5-2 | 200,000 | 800,000 | 1,000,000 |
Gallery
Major points to get on each boss apart from leeching (click to enlarge)
Strategy
Don't be fooled by the difficulty curve
The game's difficulty curve is not progressive but sinusoidal. The difficulty represented by boss 2 may lead to discouragement and the belief that the following stages will get harder and harder. Actually, stage 4 and its boss, whose attacks are partly random, are the only major difficulty. So don't let yourself be intimidated by boss 2, which can be easily destroyed with a little method and learning.
Banish management
Entire score relies on "banish" so you need to know how and when filling and emptying your gauge. Each movement is planned to give the "banish hit" you need at a precise moment. Fill the gauge using the shot on strong enemies and use the banish to give them the last hit and destroy the weak ones all around. One ground enemy, strong or weak = one medal so you don't want to burn your gauge without reward.
Rank control
Cyvern is a permissive game if you're playing for survival, but when you're playing for score, every unintentional death reduces the chances of using your extends for score. Rank control is crucial, especially during first loop. In general, the game becomes much harder from the 4th extend onwards. To score, you want your enemies as weak as possible to collect more medals with less "banish". As you win an extend every million, suicide is part of the game. Bombing lowers the rank but losing a life is more efficient because you'll lose all the accumulated powerups. In first loop, there is no need to have 4 or more extends because rank will be off the charts : you won't make points and probably die anyway. It's better to choose when and how you gonna lose a life to get more points and, in the end, the extends you need to go on. Best players rarely keep more than 3 extends for long.
'Suicide-plan' example
For a 13-million loop, 12 extends are available for suicide if you want to end the loop ideally with 3 extends as explained below. Here is a plan using 11 extends for suicide, showing that the margin of error is really thin.
- st 1 (1) : die on the boss to lose firepower and make leeching easier
- st 2 (1) : die on the boss to lower the rank and prevent you from having too many extends on st 3 (harder to survive and grab medals)
- st 3 (1) : die on the last red turret, before the medal area preceding the boss
- st 4 (5) : basically die before the 3 medal area announced by long ships with multiple turrets. At least one death is needed during boss fight and you may lose another life on the two big green ships in order to score the difficult green/red turrets area before the boss.
- st 5 (3) : two mandatory death before the medal area in end-stage and on last boss if you want to destroy every parts. It's useful to suicide at the end of mid-boss fight to have powerups floating for the next section.
Choose your boss
stage 1, loop 1
In stage 1 (both loops) you will get more points from the green boss. In the first loop, just pick all big powerups and bomb during the stage. Destroy the orange ships quickly to get the big powerups, otherwise, you will not be able to raise the rank to the level required to get the green boss.
stage 1, loop 2
In the second loop, it's more difficult to set the rank right but if you have 3, 4 or 5 extends and suicide right before the boss, you'll meet "green". In general, the setup for scoring is 3 extends then suicide. Basically, the game forces you to come back to 2 extends, i.e. the initial resources of the game. With 5 extends then suicide, boss will be shooting a lot more pink arrows which makes the leeching almost impossible. 4 extends then suicide can be a good compromise, as you can leech the boss before the rank rises again, depending on the score you have at the start of the fight and how far is the next million (see infra, advanced strategy).
If you have more extends or if you don't suicide, you'll probably get the red boss. It's possible to face the brown boss on second loop but that means you are very low on extends/bombs/powerups. It's very hard to beat the second loop with so few resources, especially as you won't earn many points with this boss.
stage 1, loop 2, advanced strategy
If you get a 4th extend during the stage, ideally at the end, just before the boss and the suicide, you'll then have time to milk the boss before reaching the next million, which will ideally occurs at the timeout. In this way, you can score the boss completely and still have an extra extend, compared to the regular strategy explained supra.
Ex. : if you have a .500k score (around 12.5 M, for example) and 3 extends at the start of the stage, then grab all 10k medals, you'll get the 4th extend at the very end of the stage, which is perfect.
stage 2
If you no-miss the first 2 stages on first loop, you may meet the red boss 2. And that's no good news. Just suicide to get points on boss 1 and ease your life. In second loop, if you really don't want to meet the red boss 2 and if you have at most 3 extends, suicide just before the fight and you should get the easy grey boss.
Don't neglect scoring, even when you're just starting out
Scoring allows you to earn extends and therefore manage rank and difficulty. Scoring means surviving. It's easy enough to target the most valuable parts of bosses and keep the medal chain alive, without optimizing or taking unnecessary risks. If you make a medal appear, you must be certain to collect it so you should never try to grab medals without a bomb in stock. If you have no bombs and don't want to suicide, forget about the medals and just shoot you way through the area without banishing.
Beware of timeouts
Bosses have no lifebar and time to destroy them is limited. It's particularly important for boss 1 and 3 because you want to cancel as many blue bullets as possible. Tips for boss 3: doors that launch blue bullets open 8 times before timeout. Mid-boss 4 can be leeched but the expected points may not be worth the time and risk (around 50,000 pts ; timeout = 3 minutes).
Watch your back
Enemies can shoot you at very close range. You have to be upon them to be safe. And they can shoot you from all directions, even from the bottom of the screen, behind your back.
Use all your resources
Nothing is useless : shot, bomb, banish, lives. You'll need everything to put yourself in the best possible situation before a big scoring phase. Sometimes, you want to keep powerups floating around and pick them up later to fill your banish gauge. Beware: after a while, items leave the screen.
Adapt yourself
Game has a slight touch of randomness: powerups floating around, random attacks of boss 4, rank variations... Of course, you'll have your routine and consistent moves but you'll need to adapt: each run is different from the other. You won't need to practice a lot on savestates in this game. Playing over and over and creditfeeding is the way to go. It's not a "perfect sheet music" type of game: if you suffer one or even multiple unplanned deaths, or if you used more bombs than usual, don't restart, the rank will be lower so you might get a good score anyway and extends that go with it.
Tips for second loop (survival)
You can follow, more or less, the same route as in the first loop, but you're gonna be late at some points because of resistance of the enemies. Let some enemies go and use your shot and bombs to stay on track. Play stage 1-5 carefully to stack up extends and absorb the difficulty which increases a lot from boss 2-2.
Version differences
There is no difference between US and japanese version, excepted for the main screen, which can be modified in the US version service mode.
Cyvern Plus
Mysterious hacked version of the game with major differences. No way to play it nowadays until further notice :
- 2nd loop rejects stage 1,2, and 3, and contains only stages 4 and 5
- A brand new True Last Boss was added
- Cyverns were re-balanced:
- Cyvern-1 - reduced hitbox, banish strengthened, sub-weapon reduced
- Cyvern-2 - banish strengthened
- Cyvern-3 - drift reduced, sub-weapon strengthened
- C Autofire changed to 30hz (Max Autofire Rate)
- Boss life bars
- Score/point and bullet/rank tweaks
- Top score (only) is saved by battery backup
- Ending Credits "Special Thanks" section added 8 additional names including CFK-NRK
Gallery
See Cyvern:_The_Dragon_Weapons/Gallery for our collection of images and scans for the game.
Strategy guide
References & Contributors
Page created by RZM using a template provided by CHA-STG and Plasmo.
Images taken from spriters-resource.com and screenshots

