Difference between revisions of "DoDonPachi DaiFukkatsu Arrange B"
| Line 115: | Line 115: | ||
These two rank values '''increase constantly over time'''. Using '''Auto-Shot''' will cause the <span style="color:blue">Speed Rank</span> to increase, and using '''Laser''' will cause the <span style="color:orange">Density Rank</span> to increase. Both ranks cap out at a maximum of '''10000'''. | These two rank values '''increase constantly over time'''. Using '''Auto-Shot''' will cause the <span style="color:blue">Speed Rank</span> to increase, and using '''Laser''' will cause the <span style="color:orange">Density Rank</span> to increase. Both ranks cap out at a maximum of '''10000'''. | ||
| − | '''Dying''' will cause the Global Ranks to '''decrease'''; <span style="color:blue">Speed Rank</span> will drop if you were using '''Auto-Fire''', and <span style="color:orange">Density Rank</span> will drop if you were using '''Laser'''. | + | '''Dying''' will cause the Global Ranks to '''decrease''' by '''50''' each death; <span style="color:blue">Speed Rank</span> will drop if you were using '''Auto-Fire''', and <span style="color:orange">Density Rank</span> will drop if you were using '''Laser'''. |
==== Individual Enemy Rank ==== | ==== Individual Enemy Rank ==== | ||
Revision as of 14:39, 25 June 2020
Contents
DoDonPachi DaiFukkatsu Arrange B


DoDonPachi DaiFukkatsu Arrange B is an incredibly unique arrange mode of DoDonPachi DaiFukkatsu; a score attack mode featuring a rank system that constantly changes based on how the player plays the game.
Rather than play all stages of the game in a full run, the player chooses one of the five stages to play, each one which contains its own area rank, which influences how the stage will play out in real-time. The arrange mode is nearly infinitely re-playable, due to the massive amount of potential runs a stage can have (each requiring a slightly different strategy of approach) and the high level of "customization" possible due to these factors.
This version of the game will be referred to as "DFK B" in this guide.
Controls

DFK B shaves the button count from DFK 1.0/1.5/BL in half, going from 4 buttons to 2. The player's ship is now set to Auto-Fire its Shot when the A button is not being held down, and the Bomb and Hyper functionalities are packed into the same button. The overall mechanics of the game are revised and remixed in several ways!
- A (Released): Fires the player's Auto-Shot weapon, which now has two additional options with the ship that fire very short Lasers (this cannot be turned off)
- A (Hold): Fires the ship's "focus" Laser weapon, slowing player movement and extending the options' laser length to about 50% vertical length of the screen
- B (Tap/Press): Releases a Manual Bomb, clearing the screen of bullets and dealing massive damage to enemies on screen
- If the B button is pressed during a Hyper Counter that was activated with 2 full Hyper Gauges, the player will cancel the Hyper Counter with a Free Bomb
- Bombs also absorb all Ground Stars on screen
- B (Hold): Activates Hyper Counter, which can cancel pink bullets and turn them into Expert Items (blue bullets are unaffected)
Ships
Just like in other modes and releases of DFK, and following DonPachi series traditions, the player is given the option of three different ships, each with their own positives and negatives:

- Type-A (red): Fast movement speed + narrow Shot; three options circle around the front of the player's ship
- Auto-Shot: Laser options position themselves about 2 ship lengths above and 1 ship width away
- Laser: Laser options position themselves about 1 ship length above and 1 ship width away
- The option placements of the Type-A makes it a powerful mid-range ship, able to quickly and nimbly reposition itself and give it enough breathing room to make twitch dodges when necessary. However, the narrow shot gives it trouble in scenarios with many enemies packed onto the screen. Its Laser range in particular is very narrow. In exchange, its movement speed makes it great at redirecting bullet volleys on-screen and moving in and out.
- Type-B (green): Average movement speed + Shot options angle with player movement; three options, two next to the player and one directly behind them
- Auto-Shot: Laser options position themselves about 1 ship length above and 1 ship width away
- Laser: Laser options position themselves about 2 1/2 ship lengths above and 1 ship width away
- The Type-B serves a similar role here as it does in other DonPachi games, serving as a technical ship that performs at a middle ground between the A and C ships. Its laser options being closer together when using Auto-Shot gives it better point-blank capabilities than the Type-A, and the swerving shot can catch enemies at particular angles and give the player a high amount of control with their Shot, but it does require excellent ship control from the player.
- Type-C (blue): Slow movement speed + wide Shot; three options, one directly in front of the ship and two next to / slightly behind the ship
- Auto-Shot: Laser options position themselves about 1/2 ship length above and about 1 1/4 ship width away
- Laser: Laser options position themselves about 1 ship length above and about 2 1/2 ship widths away
- The Type-C is both great at crowd coverage, and a point-blanking monster, due to the high amount of projectiles it fires combined with the laser options sitting close to the player when firing the Auto-Shot. It is a particularly useful ship when dealing with high durability enemies. Its movement speed gives it great micro-dodging handling, but does require a careful hand when being forced to macro-dodge and swerve through challenging bullet patterns. Finally, its Laser offers fantastic screen coverage due to how far apart the laser options move, allowing it to efficiently clear screens of enemies while nimbly tap-dodging through a densely packed screen of firepower.
Ship Customizations
Instead of selecting Styles (such as in DFK 1.0, DFK 1.5 and DFK BL), the player can instead pick between three different Customizations, each one having its own particular benefit and downside. The player isn't limited in their selection, as they can pick as many as they wish (or none at all), allowing them to custom-tailor their ship to their needs.

- Bomb Customization
- ( + ) The strength of Manual Bombs are increased (does not apply to Free Bomb or Auto-Bomb)
- ( - ) Overall Hyper Meter gain is reduced
- Laser Customization
- ( + ) When using the Laser, the length of the laser options' mini-Lasers is increased from 50% of the screen to 90%
- ( - ) Overall movement speed is reduced
- Hyper Customization
- ( + ) Activating Hyper Counter grants a brief moment of invincibility
- ( - ) Duration of Hyper Counter is reduced
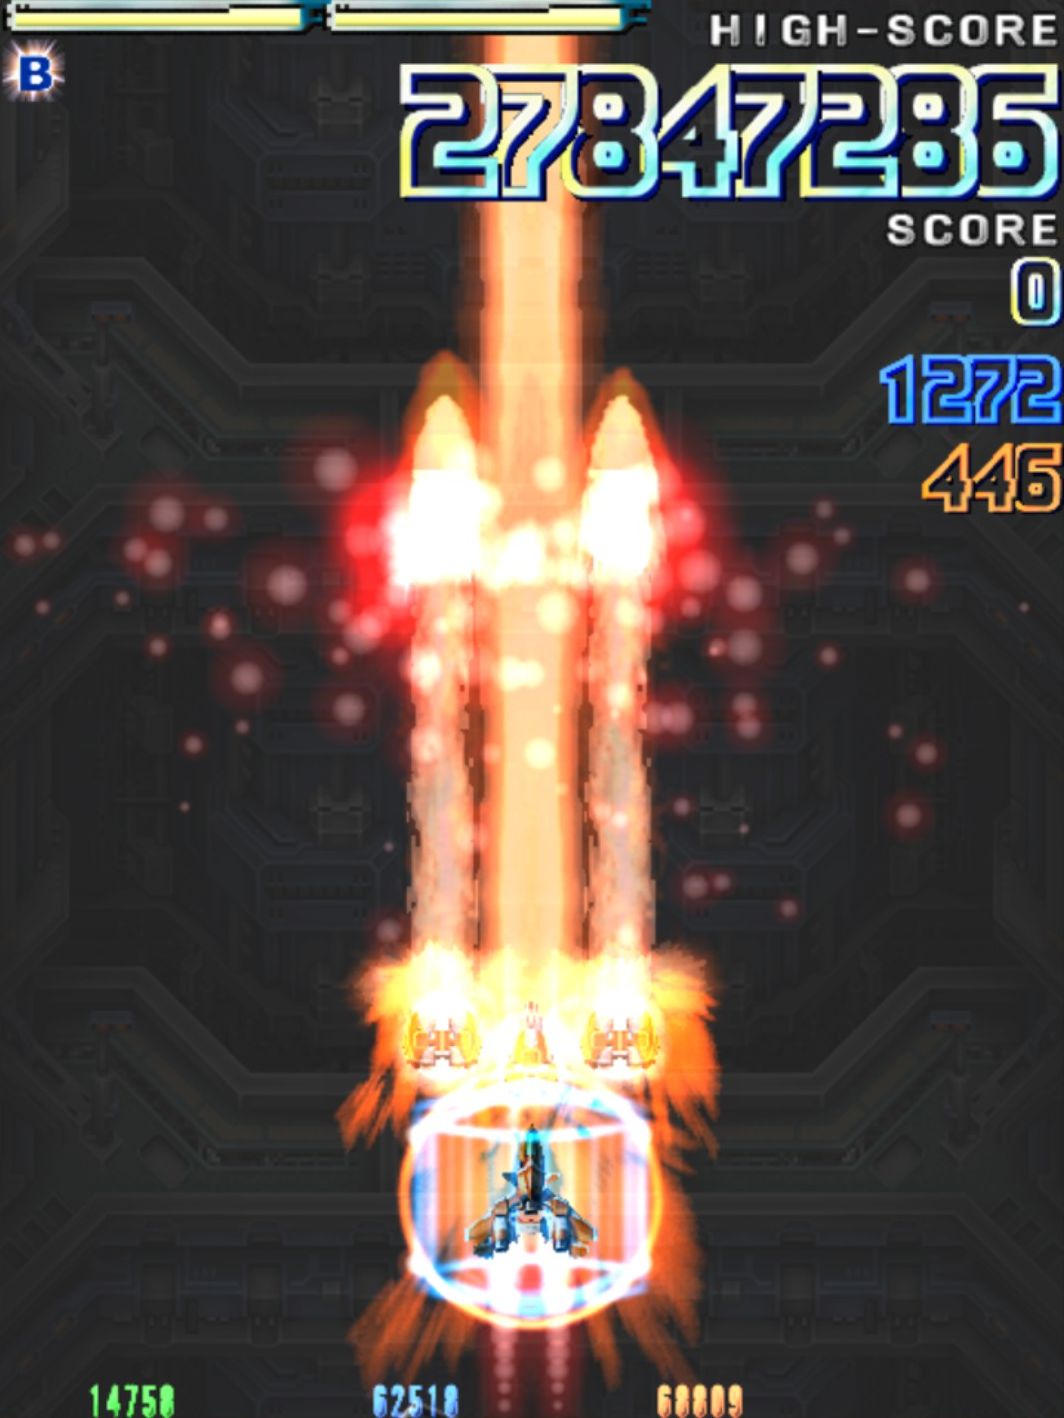
Heads-Up Display (HUD)

The UI of DFK B is significantly different than the other modes in DFK, and is packed quite densely with unmarked information and various numbers.
Special thanks to QSD for providing the screenshot/diagram on the right.
- Hyper Gauges -- Hyper Gauge is tied to both Hyper Counters and Bombs. Two meters can be filled at once.
- When the "B" icon appears under the gauges, the player has access to Auto-Bombs (costs 1 gauge).
- High Score -- High score recorded for the Stage.
- Current Score -- The score that the player currently has for the Stage.
- Global Rank -- Divided into Speed Rank and Density Rank.
- (See Rank System/Global Rank for more info.)
- Area Rank -- Total value of all enemy ranks in the area.
- From left to right; Durability Rank, Speed Rank, Density Rank
Items

The primary collectible item in this mode is the Expert Item, a gray hexagon that appears either when canceling pink bullets in Hyper Counter, or dropped by enemies when the Destruction Gauge fills up to red. Expert Items are worth 10pts each when collected, and are usually dropped in groups of six at a time.
Ground Stars serve a different purpose in Arrange B, as they refill the player's Hyper Meter instead of awarding points. Small Ground Stars fill up the Hyper Meter by about 2-5%, and Large Ground Stars refill about 15-20% (note: these values are estimations).
Bomb items and Extends are removed from DFK B, with the Bomb functionality now tied to the Hyper Meter, and the player given infinite lives.
Rank System

DFK B's most notable and unique remix on the original DFK mechanics is highlighted through an extremely complex "Global Rank System," which increases in complexity and difficulty with every run of a stage. Essentially, in the simplest terms possible, the way that you play a stage will influence the ways in which the stage's behavior changes in the next run. With each play of the game, enemies in that stage will grow in durability, their attacks will become more aggressive, and their bullet patterns become thicker and faster.
Global Rank
The Global Rank is divided into two digits, which we will refer to as Speed Rank (blue) and Density Rank (orange). Speed Rank determines the overall speed of the bullets fired by the enemies, whereas Density Rank determines the thickness of bullet patterns fired by the enemy, and as the rank increases, further layers of bullets get added onto and fired alongside/on top of the enemy's pre-determined patterns.
These two rank values increase constantly over time. Using Auto-Shot will cause the Speed Rank to increase, and using Laser will cause the Density Rank to increase. Both ranks cap out at a maximum of 10000.
Dying will cause the Global Ranks to decrease by 50 each death; Speed Rank will drop if you were using Auto-Fire, and Density Rank will drop if you were using Laser.
Individual Enemy Rank
WIP
Area Rank
WIP
Boss Rank
WIP
Strategy
WIP
Trivia
WIP
References & Contributors
- Page layout, formatting, organization, and research + verification provided by CHA-STG
- Information research + verification provided by QSD | via Shmups Discord
- DoDonPachi Resurrection ArrangeB(Steam version) Counter stop No miss ( 怒首領蜂大復活アレンジB(Steam版)ノーミスカンスト ) [ Stage 5: 9,999,999,999,999pts ], by QSD | https://www.youtube.com/watch?v=W4ApJVV2m0g