From Shmups Wiki -- The Digital Library of Shooting Games
Jump to navigation
Jump to search
Enemy list
Stage 1
| Enemy |
Health |
Score |
Danger level |
Item drop |
Appears in...
|
 |
Very Low |
130 |
Low |
- |
Stage 1, 2, 3, 4
|
| Harmless popcorn helicopter that dies in one hit.
|
| Enemy |
Health |
Score |
Danger level |
Item drop |
Appears in...
|
 |
Low |
1,200 |
Low |
Power-Up |
Stage 1, 2, 3, 4, 5
|
| The item carrier has a comparatively high score value making it worthwhile to include early on in chains.
|
| Enemy |
Health |
Score |
Danger level |
Item drop |
Appears in...
|
 |
Low |
190 |
Low |
- |
Stage 1
|
| A harmless turret shooting bullets occasionally when the bushes open up.
|
| Enemy |
Health |
Score |
Danger level |
Item drop |
Appears in...
|
 |
Very Low |
turret: 60
base: 270 |
Low |
- |
Stage 1, 2, 3
|
| Consists of two parts and often comes in groups therefore making it very important for longer chains.
|
| Enemy |
Health |
Score |
Danger level |
Item drop |
Appears in...
|
 |
Low |
600 |
Low |
- |
Stage 1, 4, 5
|
| Another simple turret that you shouldn't worry about too much.
|
| Enemy |
Health |
Score |
Danger level |
Item drop |
Appears in...
|
 |
Medium |
turret: 330
base: 4,400 |
Low |
- |
Stage 1
|
| High score value but difficult to chain due to the higher health. Will keep shooting from its back turrets even once the main turret is gone.
|
| Enemy |
Health |
Score |
Danger level |
Item drop |
Appears in...
|
 |
Medium |
1,310 |
Low |
- |
Stage 1
|
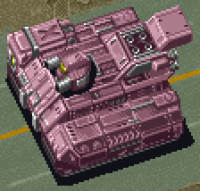
| This bunker can only be destroyed once the turret on the roof is fully opened. Blow it up and four small tanks will appear underneath it.
|
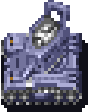
| Enemy |
Health |
Score |
Danger level |
Item drop |
Appears in...
|
 |
High |
turret: 60
base: 1,500 |
Medium |
- |
Stage 1
|
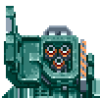
| The midboss of stage 1. This enemy can be very dangerous if you don't take it out as quickly as possible. Very lucrative to include early on in a chain.
|
| Enemy |
Health |
Score |
Danger level |
Item drop |
Appears in...
|
 |
Low |
150 |
- |
- |
Stage 1
|
| It's just a house. No danger.
|
| Enemy |
Health |
Score |
Danger level |
Item drop |
Appears in...
|
 |
Low |
1,120 |
- |
Star Item x4 |
Stage 1
|
| Another scenery object. No danger level but leaves behind four Star Items.
|
| Enemy |
Health |
Score |
Danger level |
Item drop |
Appears in...
|
 |
Very Low |
110 |
- |
Bee Medal |
Stage 1, 3
|
| Shoot this small car for a Bee Medal.
|
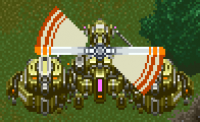
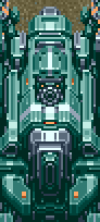
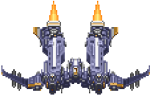
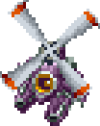
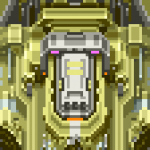
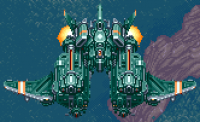
Stage 1 Boss
| Enemy |
Health |
Score |
Danger level |
Item drop |
Appears in...
|
 |
Medium |
1,500 |
Medium |
- |
Stage 1
|
| Turret at the back of stage 1 boss that shoots a very wide 7-way spread when opening.
|
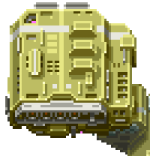
| Enemy |
Health |
Score |
Danger level |
Item drop |
Appears in...
|
 |
Medium |
1,500 |
Medium |
- |
Stage 1
|
| Turret at the side of stage 1 boss that shoots a fast stream of bullets. Can't be damaged as long as the turret on the back is still active.
|
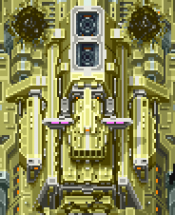
| Enemy |
Health |
Score |
Danger level |
Item drop |
Appears in...
|
 |
Very High |
100,000 |
Medium |
- |
Stage 1
|
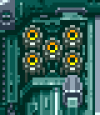
| The core of the boss changes attack patterns once all four turrets are destroyed. If you wait for too long a very deadly attack pattern is fired after a while. The core of the boss has significantly more health during the loop.
|
Stage 2
| Enemy |
Health |
Score |
Danger level |
Item drop |
Appears in...
|
 |
Very Low |
turret: 60
base: 270 |
Low |
- |
Stage 1, 2, 3
|
| Consists of two parts and often comes in groups therefore making it very important for longer chains.
|
| Enemy |
Health |
Score |
Danger level |
Item drop |
Appears in...
|
 |
Very Low |
330 |
Low |
- |
Stage 2
|
| Popcorn enemy that shows up in various formations but rarely becomes a threat.
|
| Enemy |
Health |
Score |
Danger level |
Item drop |
Appears in...
|
 |
Medium |
510 |
Low |
- |
Stage 2, 4
|
| Harmless midsize plane with a directly aimed line of bullets. Behavior is very easy to predict. Don't let it push you too far to the side.
|
| Enemy |
Health |
Score |
Danger level |
Item drop |
Appears in...
|
 |
Very Low |
130 |
Low |
- |
Stage 1, 2, 3, 4
|
| Harmless popcorn helicopter that dies in one hit. The helicopter formations directly aimed at the player can be lured around the screen to set up for bigger chains.
|
| Enemy |
Health |
Score |
Danger level |
Item drop |
Appears in...
|
 |
Low |
800 |
Low |
Star Item |
Stage 2
|
| A simple turret. Not a big deal.
|
| Enemy |
Health |
Score |
Danger level |
Item drop |
Appears in...
|
 |
Low |
800 |
Low |
Star Item |
Stage 2, 3, 4, 5
|
| A small turret that wouldn't be an issue on its own. However, since it appears with numerous other turrets on the big yellow ships, it can create some very hectic scenarios.
|
| Enemy |
Health |
Score |
Danger level |
Item drop |
Appears in...
|
 |
Low |
800 |
Low |
Star Item |
Stage 2
|
| A slightly less dangerous turret. May only cause trouble in groups with other turrets.
|
| Enemy |
Health |
Score |
Danger level |
Item drop |
Appears in...
|
 |
Medium |
800 |
- |
- |
Stage 2
|
| A scenery object. However, as it blocks the path to the more dangerous core of the yellow ships, it can be quite a nuisance. Take out as soon as possible and focus on the core.
|
| Enemy |
Health |
Score |
Danger level |
Item drop |
Appears in...
|
 |
Medium |
800 |
Medium |
- |
Stage 2
|
| The core of the yellow ships can be comparatively dangerous sometimes. The frequency of the bullet spread is high and is difficult to see in crowded scenarios. Don't underestimate!
|
| Enemy |
Health |
Score |
Danger level |
Item drop |
Appears in...
|
 |
Medium |
800 |
- |
Bee Medal |
Stage 2
|
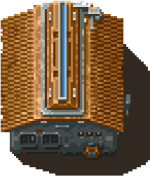
| Scenery objects awarding the player with Bee Medals. The two yellow ships at the end of the stage have one crate each placed outside of the screen. Type C can reach both of them anyway. Type B can only reach the crate out of screen to the left. Type A can reach neither of them.
|
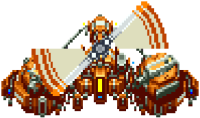
| Enemy |
Health |
Score |
Danger level |
Item drop |
Appears in...
|
 |
Medium |
turrets: 200
base: 3,000 |
Medium |
- |
Stage 2
|
| Potentially dangerous aircraft that is very important for chaining due to the high score value of the base.
|
| Enemy |
Health |
Score |
Danger level |
Item drop |
Appears in...
|
 |
Low |
100 |
Low |
- |
Stage 2, 4
|
| Another small fry. Shoot it down and focus on other things.
|
| Enemy |
Health |
Score |
Danger level |
Item drop |
Appears in...
|
 |
High |
turret: 420
base: 6,400 |
High |
[Bomb] |
Stage 2
|
The midboss section holds 3 of these very dangerous enemies. If you are playing for survival use a planned laser bomb. Very important for chaining.
This enemy drops a bomb item when destroyed without the use of a bomb during the loop only.
|
| Enemy |
Health |
Score |
Danger level |
Item drop |
Appears in...
|
 |
Low |
1,200 |
Low |
Bomb |
Stage 2, 3, 4, 5
|
| The item carrier has a comparatively high score value making it worthwhile to include early on in chains.
|
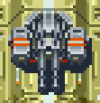
Stage 2 Boss
| Enemy |
Health |
Score |
Danger level |
Item drop |
Appears in...
|
 |
Low |
- |
Low |
- |
Stage 2
|
| These discs will be fired in streams and try to ram into you. Be sure to have an active laser and they can't reach you. Don't try to milk them as there is no point reward!
|
| Enemy |
Health |
Score |
Danger level |
Item drop |
Appears in...
|
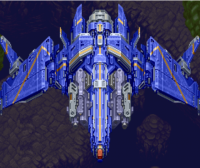 |
Very High |
210,000 |
Medium |
- |
Stage 2
|
| Try to stay as much in the center of the screen as possible particularly when the boss is sweeping from side to side.
|
Stage 3
Stage 3 Boss
Stage 4
Stage 4 Boss
Stage 5
Stage 5 Boss
References & Contributors
- Most of the image files are taken from an unreleased guide on Donpachi bearing the title "De Taisabachi à Inbachi: Guide complet des shoot them ups de la compagnie Cave, (1) Donpachi, Le dernier des Toaplan" from the French user "Yami" posted on discord on November 18th, 2018.


