Transcendpang
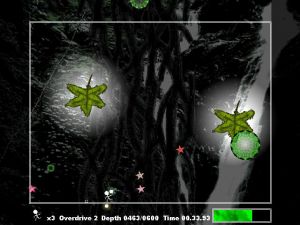
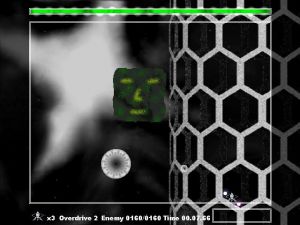
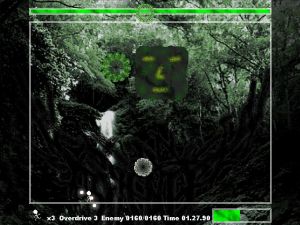
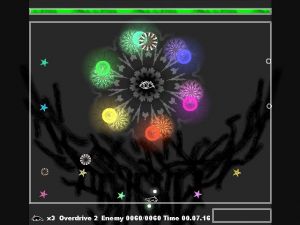
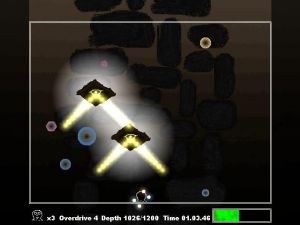
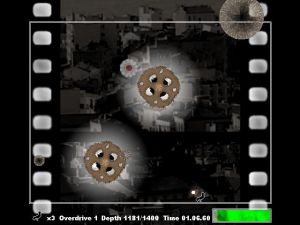
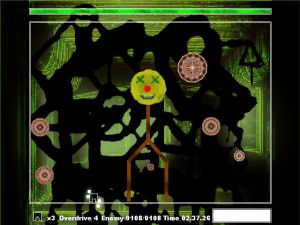
TranscendPang is a freeware doujin shoot 'em up created by wosderge. The game's gameplay is mostly derived from the classic arcade game Buster Bros., also known as Pang, but with some key differences. Where Buster Bros. may be described as an action game, TranscendPang takes the basic "Pang" format and turns it into a frantic shoot 'em up experience. The soundtrack features several artists from the Japanese doujin and rhythm game scenes.
Contents
- 1 Gameplay
- 2 Modes
- 3 Characters
- 4 Stages
- 4.1 Stage 1-A: Sphagnum Squarrosum
- 4.2 Stage 2-A: Easy-0
- 4.3 Stage 2-B: Rotten Soil
- 4.4 Stage 3-A: Love Entropy
- 4.5 Stage 3-B: Massive Qur'an
- 4.6 Stage 3-C: gazer
- 4.7 Stage 4-A: calm,waste.
- 4.8 Stage 4-B: KARAKUROID
- 4.9 Stage 4-C: Endoplasmic Reticulum
- 4.10 Stage 5-A: growing train
- 4.11 Stage 5-B: armament
- 4.12 Stage 5-C: HASCORALGUN
- 4.13 Stage 6-A: drug festival
- 4.14 Stage 6-B: senescent systems
- 4.15 Stage 6-C: the age of shadow
- 4.16 Stage Final-A: leftscene
- 4.17 Stage Final-B: lumpectomy
- 4.18 Stage Final-C: last mother
- 4.19 Stage Final-X: dwllns
- 5 Strategy
- 6 Unlocks
- 7 External Links
Gameplay
In TranscendPang, your character is fixed to the ground, with only the ability to move left and right, just like in Buster Bros. You also have a shot button, an OverDrive button and a Skill button. In total there are 12 playable characters, as well as 2 secret characters, where each character has unique stats for movement speed, wire speed and overdrive damage, as well as completely unique skills.
You progress through the stage by shooting incoming balls that appear at the top of the screen and bounce around on the stage, and by destroying bigger enemies that appear from time to time, called sentinels. Each stage has unique theme with its own music where all the sound effects for shot and kills add to the music that's already playing, creating a generative soundtrack. This means that your shots are synchronized to the tempo of the music that's playing. On top of this, it is only possible to have 2 wires on screen at a time, though some skills let you increase the limit.
The goal is to reach the total depth of the stage before going up against a boss encounter. Scoring in this game revolves around using bombs in order to get bonuses while trying to reach the total depth of the stage and beat the boss as quickly as possible. Shooting balls will cause them to split until they reach their smallest size, in which they are destroyed. Splitting and destroying balls, will reward you with score, which is added to your current depth.
The gameplay HUD displays this information to you, starting from the bottom left:
- Lives: This is how many lives you have left before you get Game Over. The maximum amount of lives you can have is 9.
- Shield (Normal Level): This displays how much left there is of your shield. It starts at 100% every stage or every time you respawn. When you get hit, your shield is reduced by 50%. If your shield is depleted to 0%, you will lose a life. However, if the shield has been depleted, it will regenerate over time until it reaches 100% again. The shield is only available if the game level is set to Normal, and replaces the Overdrive stock.
- Overdrive (Abnormal Level): This displays how many overdrives you can use before you run out. Overdrive stock is only available if the game level is set to Abnormal, and replaces the Shield.
- Depth/Enemy: Up until you reach the boss, this will show you the total depth you're currently at. Once you reach the boss however, the display will change to show you the boss's HP in digits.
- Time: This displays your current time for the stage. Once you reach the total depth of the stage, the timer will be paused until the boss encounter starts. Additionally, if you reach the total depth of the stage before the norma time, then the time will start to flash in many colors to indicate that you have beaten the norma time.
- Skill Gauge: This is your skill gauge. It'll will be green until you have filled it completely and you can activate a skill, in which case it will flash white. When you activate a skill, the gauge will deplete over time, and an alarm sound effect will sound to alert you that your skill is about to run out. If you have subskills equipped, then each skill will make the gauge color different while it depletes. When playing in normal game level, you can also spend the skill gauge to use overdrive. It is possible to refill the skill gauge while it is depleting, meaning that if you are able to refill the skill gauge before your first skill has run out, you can activate another skill on top of the first skill.
The glowing orbs that float around your character represent one of two things, depending on what the game level is set to.
On normal game level, these orbs represent your current streak of sentinels eliminated. Once you reach a streak of 6, the orbs will disappear and the streak will start over.
On abnormal game level, the orbs represent your current overdrive stock, which you can also keep track of by looking at the HUD on the bottom of the screen.
Game Level
The first time you launch the game, you will be asked if you're a human. What you choose here will determine the game level, which can be later changed in the game options.
- If you choose "Yes, I'm human." the game level will be set to Normal.
- If you choose "No, I'm shooter." the game level will be set to Abnormal.
If the game level is set to Normal, you will have a shield which is reduced by 50% every time you are hit, and only lose a life once your shield is completely depleted. Additionally, you must fill your skill gauge in order to use overdrives.
If the game level is set to Abnormal, you will lose a life immediately when you get hit, but instead of a shield, you are equipped with overdrives as its own expendable resource, which is more reminiscent to arcade shooters and bomb stocks. Your skill gauge is exclusively used for skills, and using an overdrive will now deplete your overdrive stock instead.
Outside of these changes to how resources are handled, the two modes will play exactly the same, and does not increase the difficulty of the bosses or the stages.
Controls
- Shot (Z): Fires a wire towards the top of the screen.
- OverDrive (X): Destroys all balls on screen, and deals damage to sentinels and bosses.
- Skill (C): Activates the character's special skill.
- Boost (Shift/Space): Increases the rate of incoming balls.
These are the default keyboard bindings for the game.
You can freely bind the controls to your liking in the game options, and the game supports controller inputs.
Sub-skills
You can equip up to two sub-skills for your character. This is done by moving to which character you want the skill of, and pressing either Left or Right. Their assignment is indicated by two different colored dots next to the characters whose skills you've equipped. Sub-skills are very useful, as they let you equip a total of 3 skills, since you also keep the skill of the character you're playing as.
In order to active a skill, you need to build up your skill gauge and hold either Up or Down while activating the skill.
- The skill you selected with Left gets assigned to DOWN + Skill (pink dot)
- The skill you selected with Right gets assigned to UP + Skill (green dot)
If you're able to rebuild the skill gauge before the skill runs out, then you can activate another skill in the middle of the first skill, making it possible to combine two skills. The only catch is that sub-skills deplete the skill gauge much quicker than your primary skill, so be careful when activating it.
Bombs
Bombs in this game refers to the glowing balls that explode after 4 beats. Throughout the stage, bombs will spawn in naturally from the top of the screen, but they appear in a different color than the regular balls.
Regular Bombs
Regular bombs are usually red or orange, and once ignited they will glow white. You can also tell if they're about to explode by listening to their audio cue, which is typically a short musical phrase that lasts for 4 beats. If you shoot a bomb while it is glowing white, you will delay its explosion until the next cycle.
If a bomb's explosion hits balls the same size or smaller than itself, it will destroy those balls immediately. However, any balls that are one size large will be turned into bombs themselves when hit by the explosion.
If a bomb comes in contact with a sentinel or a ruler (boss), it will explode immediately, while also dealing a lot of damage. However, the player can not be hurt by a bombs explosion, but they can be hurt if a bomb bounces into the player.
It is also possible to create bombs yourself. If you are able to split the same ball three times before it hits the ground after spawning, it will turn into a bomb. This means that in order to create bombs, the ball needs to be at least size 4 or 5. If a ball has already touched the ground once after spawning, you'll have to split it 4 times before it'll become a bomb.
Black Bombs
Black bombs however can hurt the player with their explosion. These will appear purple/pink, or green if color support is turned on.
While they behave like normal bombs, they will also turn smaller balls into black bombs. You can turn them into regular bombs by shooting them while they're not ignited. That means that if a black bomb is ignited and about to explode, you'll have to hit it once to deactivate it, and then once again in order to turn it into a regular bomb.
Black bombs will not damage sentinels or bosses.
Depth
Depth is the metric of progression and score in the game. By hitting balls and destroying sentinels, you get points which are added to the depth.
Each stage has a pre-defined total depth, which is presented to you at the start of the stage. Once you have reached that depth, you will have reached the end of the stage and the stage's boss will appear. Additionally, each floor of the stage has its own target depth which is required to reach in order to progress to the next floor. However, due to how the floor change only happens at the start of each musical phrase, it is possible to exceed the target depth of each floor. It is not possible to exceed the total depth of the entire stage.
Norma Time
Each stage has a norma time, which is presented to you at the start of every stage. If you are able to reach the total depth of the stage within the norma time, you will face the NEO version of the boss, instead of the regular version. The exception is the final stage, which does not have a NEO version of the boss, and the norma time is infinite (but displayed as 59:99.)
If you have reached total depth within the norma time, the game will indicate this by making the timer flash in several colors, rather than staying pure white.
Bonuses
While playing the game, you can be rewarded by two main types of bonuses, one for eliminating sentinels or bosses, and one based on the size of bombs.
Sentinels Eliminated
This reward is only available when the game level is set to Normal.
For every 6 sentinels eliminated, you will be rewarded with an extend. This includes sentinels eliminated across two different stages. For example, if you eliminated 4 in one stage, you will get the reward once you eliminate 2 sentinels in the next stage.
If you currently have 9 lives, then you can not get another extend, which will cause the orbs around you character to continue piling up beyond 5.
Assault Bonus
This reward is only available when the game level is set to Abnormal.
There are certain spots in the game where two or three sentinels will appear at the same time. If you are able to defeat them without taking any damage or using any overdrives, you will receive a reward.
| Condition | Reward |
|---|---|
| Single Assault Bonus | No reward |
| Double Assault Bonus | +1 OverDrive |
| Triple Assault Bonus | Extend |
Boss Eliminated
For every boss defeated, you are rewarded with an extend.
Sublimation Bonus
A sublimation bonus is rewarded to you based on the size of the largest bomb exploded during a chain. The bonus will be rewarded once the last bomb in a chain has exploded.
Keep in mind that hostile (purple) bombs do not reward any bonuses. You need to turn them into regular bombs in order to get a reward from them.
| Tier | Reward |
|---|---|
| 1st Sublimation Bonus | No reward |
| 2nd Sublimation Bonus | Score bonus (Needs research for calculation) |
| 3rd Sublimation Bonus | Full skill gauge |
| 4th Sublimation Bonus | Shield +50% (Normal Mode) or +1 OverDrive (Abnormal Mode) |
| 5th Sublimation Bonus | Extend |
| 6th Sublimation Bonus | All Plus: Full skill gauge, shield/overdrive increase and one extend. |
It is only possible to get the 6th sublimation bonus in the final stage of the game. For stages 1 through 6, the highest tier you can get is the 5th sublimation bonus.
Modes
The game has 5 modes you can choose between.
Wandering Mode
This is the main mode of the game. In this mode you have to play through 7 stages out of a possible 19, arranged in a branching tree, similar to the Darius series.
The tree has a depth of 3 branches, except the final stage which has 4 potential stages. You can only move between adjacent branches, i.e. from A to B, or from C to B, but not from A to C.
Your performance in each stage is what determines what the next stage will be.
| Movement | Condition |
|---|---|
| A to A | Defeat normal boss. |
| A to B | Defeat NEO boss. |
| B to A | Defeat normal boss. |
| B to B | Defeat NEO boss. |
| B to C | Defeat NEO boss and leave the stage with 2 more lives than what you entered with. |
| C to B | Defeat normal boss. |
| C to C | Defeat NEO boss. |
The exception to this rule is stage 2-B, which lets you move up to 3-C without getting the two extends which are normally required.
Additionally, the Final stage has slightly different criteria, due to adding a new branch.
| Stage | Condition |
|---|---|
| Final-A | Clear 6-A without beating the norma time. |
| Final-B | Clear 6-A NEO, or clear 6-B without beating the norma time. |
| Final-C | Clear 6-B NEO, or clear 6-C without beating the norma time. |
| Final-X | Clear 6-C NEO. |
Advanced Mode
This mode lets you play a through one of 3 courses, each consisting of 6 predetermined stages.
At the end of each stage, you will always face the NEO version of the boss, and you may not use any continues. If you get Game Over, you have to restart from the beginning.
Some courses must be unlocked before you can play them.
| Course | Stage 1 | Stage 2 | Stage 3 | Stage 4 | Stage 5 | Stage 6 |
|---|---|---|---|---|---|---|
| Normal | Sphagnum Squarossum (1-A) | Love Entropy (3-A) | calm,waste. (4-A) | growing train (5-A) | drug festival (6-A) | leftscene (Final-A) |
| Maniac | Easy-0 (2-A) | Massive Qur'an (3-B) | KARAKUROID (4-B) | armament (5-B) | senescent systems (6-B) | lumpectomy (Final-B) |
| Transcend | Rotten Soil (2-B) | gazer (3-C) | Endoplasmic Reticulum (4-C) | HASCORALGUN (5-C) | the age of shadow (6-C) | last mother (Final-C) |
Invasion Mode
This mode lets you play any stage freely, as long as you have played it at least once before in Wandering Mode.
Once you select your stage of choice, you may choose between the following options:
- Challenge: Attempt your best time for the stage. You will always face the NEO boss in this mode.
- Practice: Play through the stage with infinite lives. Your best time here will not be saved.
- Boss Attack: Go straight to the boss of the stage.
- Boss Attack (NEO): Go straight to the NEO version of the boss of the stage.
Challenge is only available if you have beaten the NEO version of the boss of that stage in Wandering Mode. The same goes for Boss Attack (NEO).
Genesis Mode
This mode lets you play any custom stage the game is able to find inside the "user" folder in the game data folder.
Boss Rush
This mode is its own self contained stage which lets you play against every boss in the game in sequence. If you die you may not use a continue.
You still get an extend for every boss you eliminate in this mode, but you must face the NEO version of every boss.
Outside the fact that you encounter Nortrem C.R.I. (from 1-A) first, the order in which you encounter each boss is random every time you play this mode.
| Song Title | Silver sphere |
| Composer | 8 to 7 |
Characters
Each character has its own unique stat for movement speed (Speed), wire speed (W-Speed) and OverDrive power (OD-Power), as well as a unique skill for every character.
Speed and Wire Speed both range from 6 to 10, where 10 is labelled as M. OverDrive Power ranges from 1 to 4, though some characters have 0.
Stigma
The Stickman
| Speed | 7 |
| Wire Speed | 7 |
| OverDrive Power | 3 |
| Skill | Tri-Wire |
| Skill Duration | Long |
Tri-Wire allows you to have 3 wires on screen at the same time rather than just 2.
Ri
The Spirit
| Speed | 6 |
| Wire Speed | 6 |
| OverDrive Power | 3 |
| Skill | Shield |
| Skill Duration | Long |
Shield grants you immunity against one hit.
Neove
The Flower of Fantasy
| Speed | 6 |
| Wire Speed | 9 |
| OverDrive Power | 2 |
| Skill | SideChain |
| Skill Duration | Medium |
SideChain lets you shoot two wires at the same time from the sides of your character, rather than from the center.
Kadys
The Crystal Lifeform
| Speed | 7 |
| Wire Speed | Max |
| OverDrive Power | 1 |
| Skill | HARD-WIRE |
| Skill Duration | Short |
HARD-WIRE makes it so that your wires will penetrate enemies, rather than breaking upon contact.
Lene
The Beast of Flames
| Speed | 9 |
| Wire Speed | 7 |
| OverDrive Power | 2 |
| Skill | Telecrash |
| Skill Duration | Slightly Long |
Telecrash lets you teleport slightly ahead in your direction of choice. After teleportation, you will be invincible for 1 second, and you will deal damage to anything near your teleportation destination.
After activating the skill, you use it by pressing LEFT+DOWN or RIGHT+DOWN. However, doing so will drain a small portion of your Skill Gauge, making it run out quicker.
Ricolita
The Owl
| Speed | 8 |
| Wire Speed | 8 |
| OverDrive Power | 2 |
| Skill | Owls' Eye |
| Skill Duration | Medium |
Owl's Eye will half the speed of all the balls.
nISQ
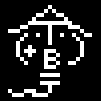
The Eyeball Monster
| Speed | 8 |
| Wire Speed | 6 |
| OverDrive Power | 1 |
| Skill | of the ripper |
| Skill Duration | Medium |
of the ripper will grant you the max wire speed.
Zunu
Author of the Scorched Earth
| Speed | Max |
| Wire Speed | 8 |
| OverDrive Power | 1 |
| Skill | Abaddon |
| Skill Duration | Medium |
When Abaddon is active, your wire will create a blast upon impact, which will also deal damage to surrounding balls, as well as deal extra damage to sentinels and bosses.
ovalizer
The Laughing Cube
| Speed | 7 |
| Wire Speed | 9 |
| OverDrive Power | 4 |
| Skill | h a n g u p |
| Skill Duration | Short |
hangup will cause all balls and sentinels to freeze. Coming in contact with a ball will not hurt you while the skill is active.
Grooge
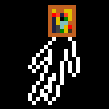
The Unidentified
| Speed | 9 |
| Wire Speed | 9 |
| OverDrive Power | 2 |
| Skill | The age of bubble |
| Skill Duration | Medium |
The age of bubble will allow you to create bombs with 1 hit less than usual.
Simurgh
Statue of the Divine Bird
| Speed | 8 |
| Wire Speed | Max |
| OverDrive Power | 0 |
| Skill | [STILL] |
| Skill Duration | Long |
[STILL] will make it so that your wire will follow your character, akin to a laser.
While the skill is active, you will need to hold down the shot button rather than tapping it. The tempo sync is also lifted while the skill is active.
Additionally, this skill will make your wire's strength be halved.
La Ancie
What was once considered an abomination
| Speed | 9 |
| Wire Speed | 8 |
| OverDrive Power | 1 |
| Skill | 0 m/bre |
| Skill Duration | Slightly Long |
0 m/bre allows you to summon up to 3 shadows. The shadows act as turrets that you can place freely on the ground.
After activating the skill, you can place shadows by pressing UP+DOWN. Doing so will drain a portion of your skill gauge, making it run out quicker.
Whenever you shoot, so will the shadows. However, if you hold DOWN while shooting, only the player will shoot. If you hold UP while shooting, only the shadows will shoot.
Abe-san
A Mysterious Creature
| Speed | 8 |
| Wire Speed | 9 |
| OverDrive Power | 3 |
| Skill | Super-Charm |
| Skill Duration | Short |
Super-Charm will cause the balls to become attracted to you, thus move towards you.
LostFace
The one who lost his face
| Speed | Max |
| Wire Speed | Max |
| OverDrive Power | 0 |
| Skill | gUErnIcA |
| Skill Duration | Very Short |
gUErnIcA will cause a wave of destruction every 2 beats.
Every ball besides the smallest size will explode.
Hostile bombs become neutralized and regular bombs will ignite.
Damage to sentinels and bosses.
Stages
Stage 1-A: Sphagnum Squarrosum
| Total Depth | 1200 |
| Norma Time | 1:20 |
| Composer | scytheleg |
This is the first stage you'll encounter in Wandering Mode of the game. Elements of this stage is also used for the game's tutorial.
The sentinels in this stage are leaves which shoot 5 stars in a circular formation. They stay completely stationary until they are either defeated, or until they time out.
Ruler: Norterm C.R.I.
The Standing Rock
| Phase | Normal | Differences in NEO |
|---|---|---|
| Pathostuffs | Floats above the ground, and cry glowing orbs which can be destroyed by your shot. |
The tears are regular balls instead of glowing orbs. |
| Earth Screams | Floats back and forth and slams its body into the ground in intervals. |
Body slams now generate shock waves, which can be cancelled out by your shot. Additionally, boulders will tumble down from the top of the screen when the boss hits the ground. |
Stage 2-A: Easy-0
| Total Depth | 2010 |
| Norma Time | 2:20 |
| Composer | copyyy |
The sentinels of this stage are green jellyfish-like beings which move around slowly and spew out glowing orbs. You can cancel out these glowing orbs by shooting them.
Ruler: Amor-Phogleria
The Devouring Philanthropic
| Phase | Normal | Differences in NEO |
|---|---|---|
| Ovumming | The boss is stationary, but it has four crystal balls which protects it from attacks. Breaking a crystal ball will cause a circle of stars to burst out, and breaking all 4 will allow you to damage the boss until they regenerate. |
N/A |
| Last Embrace | The boss is now equipped with two arms. The tip of the arms will shoot out stars. In order to damage the boss, you have to shoot at its core, as the arms block your attacks. The arms will disappear once the boss' health has been depleted. |
N/A |
Stage 2-B: Rotten Soil
| Total Depth | 1800 |
| Norma Time | 1:50 |
| Composer | wosderge |
The sentinels of this stage are white circles with scribbles on them. They will stay stationary once they've entered the screen, but they will attack by shooting a spiral of glowing white orbs. These orbs can be destroyed by shooting them.
Ruler: siromalizer
●▼●
| Phase | Normal | Differences in NEO |
|---|---|---|
| Astral | The boss moves back and forth horizontally on the screen and throw out stars in a circle formation, which then fall to the ground. |
N/A |
| Alastor | The boss moves erratically from place to place on the screen. It will pause after every movement and throw out stars like in its previous phase. |
N/A |
Stage 3-A: Love Entropy
| Total Depth | 2500 |
| Norma Time | 1:500 |
| Composer | L-more (a.k.a. cinako) |
The sentinels of this stage are hearts which stay stationary on the screen. They attack by consistently spawning in balls and hostile bombs, while also attacking with a circular star pattern.
Ruler: sodunpos
The eye that sees emotions
| Phase | Normal | Differences in NEO |
|---|---|---|
| Spread of Shine | The boss will follow after the player, while 6 glowing orbs revolve around it. The orbs will regularly shoot out stars, and occasionally they'll shoot out large balls which home in on the player. These balls can be destroyed by shooting them. Damage the boss by hitting the eye. |
N/A |
| The Spiral Encounter | The 6 orbs now revolve at different speeds. Whenever the orbs overlap, they will perform an attack. The attacks are either to fire lasers straight down into the ground, or to spawn large hostile bombs. |
N/A |
| Love and Hatred | The 6 orbs are now solid objects and can be destroyed by shooting at them for a while. Shooting the orbs will not damage the boss however. The orbs now move in a more erratic pattern across the screen. The attacks include shooting stars regularly and spawning homing balls. |
N/A |
Stage 3-B: Massive Qur'an
| Total Depth | 2800 |
| Norma Time | 2:20 |
| Composer | xenothium |
More stage details coming soon.
Ruler: Brst-Qua
The Shapeshifter
| Phase | Normal | Differences in NEO |
|---|---|---|
| Eye of Providence | The boss stays stationary at the center of the screen. It will attack by shooting light rays of different kinds. One of the attacks will attempt to trap the player between two lasers beams. A different attack will have lasers rain down from the sky. The last possible attack is a laser that follows after the player. |
N/A |
| S.M.P. | The boss is now split into several triangular pieces. Each piece can be destroyed separately, but only the one with eye will actually damage the boss. The boss will change its attacks and forms every time you hit it with a bomb during this phase. One of the forms is a snake form, where the boss will attack by shooting a red beam at the player. A different phase has all the pieces surrounding the eye piece and shooting stars. There's also a phase where all the pieces split into groups and start dropping glowing orbs. |
N/A |
Stage 3-C: gazer
| Total Depth | 3500 |
| Norma Time | 2:20 |
| Composer | scytheleg |
More stage details coming soon.
Ruler: Cock=Stale
The Silent Steel Soldier
| Phase | Normal | Differences in NEO |
|---|---|---|
| N/A | N/A | N/A |
| Mode: Analysis | N/A | N/A |
| Mode: FULL | N/A | N/A |
Stage 4-A: calm,waste.
| Total Depth | 3600 |
| Norma Time | 2:50 |
| Composer | Ritsu |
The sentinels of this stage are rolls of film which bounce around the screen. They will not perform any attacks on their own, however they will fire groups of 4 stars at the player, if you deal damage to it.
Dealing damage to the sentinels will also make them move faster.
Ruler: LandScape Dimenos
A Beautiful Sight
| Phase | Normal | Differences in NEO |
|---|---|---|
| Flashback Four Season | This phase actually has four phases on its own, which changes for every 25% of its health depleted. The first attack is the winter attack. This attack has glowing balls fall down like snowflakes. You can destroy the snowflakes by shooting them. The second attack is the autumn attack. Orange and red balls will drop to the ground, and leave the screen once they've hit the ground. The third attack is the summer attack. Laser beams will shower down from the top of the screen. The final attack is the spring attack. Bursts of pink stars will happen all around the screen. Hit the floating image in the center in order to damage the boss. |
N/A |
| The Flood of Panorama | Several objects will appear on the screen. A palm tree, a totem pole and a volcano. They each have their own attacks which they perform periodically. The palm tree will throw groups of large stars at the player. The volcano will erupt with orange and red glowing orbs. The totem pole will spawn a ball which splits into several tiny balls once hit. Each of the objects can be destroyed individually, but doing so will not deal damage to the boss. Keep in mind that even if the boss' HP is completely depleted, the objects may still perform their attacks until the music cycle ends. |
N/A |
Stage 4-B: KARAKUROID
| Total Depth | 3200 |
| Norma Time | 2:20 |
| Composer | cybermiso |
More stage details coming soon.
Ruler: a.NoN KO-NO-KO
The Ambiguous Puppet
| Phase | Normal | Differences in NEO |
|---|---|---|
| img: CRAB | The boss enters by dropping from the top of the screen. Make sure to move out of the way, as the boss can hurt you when it lands. The phase itself consists of the boss walking along the floor. If it detects that you're too far away, it will jump to your position. If you find yourself cornered, it is possible to slip between its legs while it is walking, however you can't stay between its legs without getting hurt. The only way to damage the boss is by shooting its head. |
N/A |
| img: SOL | The boss reappears and is now shaped like a sun instead. It will try to roll towards you. Eventually it will start to climb the wall and ceiling instead, before dropping down onto the ground again. |
N/A |
| img: KRAKEN | The reappears as a helicopter in this phase, and it will float around the screen. Its feet will alternate between firing stars in a fan shape towards the ground, or firing lasers directly into the ground. |
N/A |
Stage 4-C: Endoplasmic Reticulum
| Total Depth | 7200 |
| Norma Time | 3:50 |
| Composer | exci |
More stage details coming soon.
Ruler: giggle family
The Visitors
| Phase | Normal | Differences in NEO |
|---|---|---|
| First comes 'Phal' | N/A | N/A |
| Next comes 'Pham' | N/A | N/A |
| Last comes 'Phan' | N/A | N/A |
Stage 5-A: growing train
| Total Depth | 3200 |
| Norma Time | 1:50 |
| Composer | LU |
This stage's sentinels are giant bells which stay in place but swing back and forth. They'll shoot sets of 3 stars in the direction they're facing.
Ruler: cruel flow
The clock which approaches
| Phase | Normal | Differences in NEO |
|---|---|---|
| Confusion of Twelve | The boss will shoot glowing orbs out of its minute hand. Shooting the orbs will make them bounce away. The boss also teleports around the screen every time the minute hand has completed one cycle. |
N/A |
| Tick Tack Talk | The boss now moves erratically around the screen in bursts of three. Every time it moves, it also shoots a line of stars at the player. Every time the boss pauses, it'll drop a hostile bomb. |
N/A |
| Approaching Clock | The boss will stay stationary at the center of the screen and shoot orbs out of its minute hand. This phase is similar to the first phase, but this time the boss will not halt its attack until it is defeated. |
N/A |
Stage 5-B: armament
| Total Depth | 4800 |
| Norma Time | 2:50 |
| Composer | LU |
More stage details coming soon.
Ruler: EGDuRG FOOLDOOR
The door which gatekeeps foolishness
| Phase | Normal | Differences in NEO |
|---|---|---|
| N/A | N/A | N/A |
| No5 | N/A | N/A |
| They come. | N/A | N/A |
Stage 5-C: HASCORALGUN
| Total Depth | 4500 |
| Norma Time | 3:20 |
| Composer | wosderge |
More stage details coming soon.
Ruler: HASCORALVASE
The lotus flower which blooms in your brain
| Phase | Normal | Differences in NEO |
|---|---|---|
| Blooming in swamp | N/A | N/A |
| The holy spectacle | N/A | N/A |
| The mission of life | N/A | N/A |
Stage 6-A: drug festival
| Total Depth | 4444 |
| Norma Time | 2:50 |
| Composer | Ras |
The sentinels of this stage are neurons which float around the screen. Every time they're about to attack, they aim at the player's current position.
Their attack consists of shooting 3 streams of stars, where the last stars will have a higher velocity than the first ones.
Ruler: Amin /blank
Eternal Hypnosis
| Phase | Normal | Differences in NEO |
|---|---|---|
| Hemorrhage | The boss moves in erratic patterns and spews out bursts of red orbs, and ends its movement pattern by shooting a double helix laser into the ground. |
N/A |
| Astigmatism | The boss splits itself into three clones. Initially they revolve around the center of the screen, shooting stars in a fan shape towards the ground. This is followed by them shooting dense and rapid lines of stars towards the ground, before one of the clones prepares for a larger attack. The clone which has charged up will fire a huge and sporadic burst of stars. Sometimes, one of the other clones will shoot a spiral of stars while it is charging up the attack. It is possible to prevent the final burst of stars by hitting the boss with a bomb. Once the cycle restarts however, all bombs and balls on screen will be removed. |
N/A |
| Vertigo | The boss moves to random positions on the screen and fires large and dense spirals of stars. The stars fired last will have a higher velocity than the first stars fired. |
N/A |
Stage 6-B: senescent systems
| Total Depth | 5555 |
| Norma Time | 3:20 |
| Composer | wosderge |
More stage details coming soon.
Ruler: Af.Ex
A group of dead ideas
| Phase | Normal | Differences in NEO |
|---|---|---|
| Animism | N/A | N/A |
| Answers | N/A | N/A |
| Alcor | N/A | N/A |
Stage 6-C: the age of shadow
| Total Depth | 4700 |
| Norma Time | 2:50 |
| Composer | CRUNCH |
More stage details coming soon.
Ruler: loscod85
The man searching for his dog
| Phase | Normal | Differences in NEO |
|---|---|---|
| N/A | N/A | N/A |
| N/A | N/A | N/A |
| N/A | N/A | N/A |
Stage Final-A: leftscene
| Total Depth | 5000 |
| Norma Time | None |
| Composer | wosderge |
This stage's sentinels are black holes that stay stationary while rapidly firing two streams of stars in a spiral from their center.
The two streams of stars have different speeds.
Ruler: e X i S
The final stage of evolution
| Phase | Normal | Differences in NEO |
|---|---|---|
| P U L S E | Small triangles will move out from the boss in a larger triangle shape. | N/A |
| C A G E | The boss will form large walls of small triangles which fall down to the ground. You have to place yourself between the gaps in order to avoid getting hit. |
N/A |
| R A Y | The boss will send out small triangles sweeps the ground with a laser. | N/A |
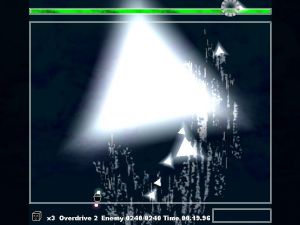
| I D E A | The boss will continuously spawn large groups of small balls while the screen gradually becomes more obstructed by a bright white light. |
N/A |
Stage Final-B: lumpectomy
| Total Depth | 6400 |
| Norma Time | None |
| Composer | LU |
More stage details coming soon.
Ruler: Killer Vector
For a better world
| Phase | Normal | Differences in NEO |
|---|---|---|
| Attribute Adder | N/A | N/A |
| Setting Subtractor | N/A | N/A |
| Sign Multiplier | N/A | N/A |
| Focus Divider | N/A | N/A |
Stage Final-C: last mother
| Total Depth | 7000 |
| Norma Time | None |
| Composer | kakyo (a.k.a. Nankumo) |
More stage details coming soon.
Ruler: Talkus & OtherTooth
Talkus, a scholar of the soul of language.
OtherTooth, the false ruler.
| Phase | Normal | Differences in NEO |
|---|---|---|
| Eruption | N/A | N/A |
| Phlakaton | N/A | N/A |
| Eclipse | N/A | N/A |
Stage Final-X: dwllns
| Total Depth | 4444 |
| Norma Time | None |
| Composer | fnixkm (a.k.a. dust.c & iraxa) |
More stage details coming soon.
Ruler: R e k A
Bricks of Corruption / The Truth
| Phase | Normal | Differences in NEO |
|---|---|---|
| I M P A C T | N/A | N/A |
| A R C H E | N/A | N/A |
| Z E U S | N/A | N/A |
| Adam's Gun, Eve's Fruit | N/A | N/A |
Strategy
Coming Soon.
Unlocks
Coming Soon.


