Difference between revisions of "Illvelo Swamp"
m |
m (→Items) |
||
| (15 intermediate revisions by the same user not shown) | |||
| Line 16: | Line 16: | ||
|art = Daisuke Nagata | |art = Daisuke Nagata | ||
| | | | ||
| − | |releasedate = November | + | |releasedate = November 18, 2021 |
}} | }} | ||
| Line 23: | Line 23: | ||
The game's title and general aesthetics draw from the original [[Illmatic_Envelope_(Illvelo)|Illvelo]], though this game introduces new mechanics and has a radically different stage structure. There are 100 stages in total (as a reference to the 100 bonus stages in the original Illvelo) | The game's title and general aesthetics draw from the original [[Illmatic_Envelope_(Illvelo)|Illvelo]], though this game introduces new mechanics and has a radically different stage structure. There are 100 stages in total (as a reference to the 100 bonus stages in the original Illvelo) | ||
| + | {{VideoIndex}} | ||
__TOC__ | __TOC__ | ||
| Line 41: | Line 42: | ||
Also, a '''shield''' appears in front of the ship and Doll if the shot button is not pressed for a short time. The shield remains in front of the ship and Doll and absorbs bullets until either the shot button is pressed again. | Also, a '''shield''' appears in front of the ship and Doll if the shot button is not pressed for a short time. The shield remains in front of the ship and Doll and absorbs bullets until either the shot button is pressed again. | ||
| − | + | == Doll == | |
Your ship is a modified TRAX called Xenostrepsi. It has a pair of circular modules called Doll. Doll are very useful for defense as Doll delete most hazards upon contact. | Your ship is a modified TRAX called Xenostrepsi. It has a pair of circular modules called Doll. Doll are very useful for defense as Doll delete most hazards upon contact. | ||
| − | [[File:Normal Doll (Illvelo Swamp).gif | 410px]] | + | [[File:Normal Doll (Illvelo Swamp).gif | 410px|thumb|The two ways of moving Doll shown in the Doll settings menu. (left) Holding the Doll button. In the default Doll speed setting, Doll move at the same speed and direction as the ship. (right) Tilting the right stick. Doll move faster and independently of the ship movement.]] |
| − | You can detach Doll from the ship by pressing Doll button. After being detached, Doll launch in the direction the ship is moving or to the front if the ship is not moving. Doll shoot normal shots even when separated from the ship. To move the detached Doll, simply use your right stick. In this way, you can move Doll more freely than the traditional method, which is to hold Doll button and move the ship | + | You can detach Doll from the ship by pressing the Doll button. After being detached, Doll launch in the direction the ship is moving or to the front if the ship is not moving. Doll shoot normal shots even when separated from the ship. To move the detached Doll, simply use your right stick. In this way, you can move Doll faster and more freely than the traditional method, which is to hold Doll button and move the ship. The speed at which Doll move can be configured in the Doll settings menu. |
Double-tap the Doll button to return Doll to the ship. | Double-tap the Doll button to return Doll to the ship. | ||
| − | + | ==Attribute== | |
[[File:Attributes.jpg|thumb|the icons for three attributes seen in the ranking screen.]] | [[File:Attributes.jpg|thumb|the icons for three attributes seen in the ranking screen.]] | ||
There are three attributes of attack you can perform in this game: '''shot, shuriken,''' and''' shield'''. | There are three attributes of attack you can perform in this game: '''shot, shuriken,''' and''' shield'''. | ||
The ship and Doll fire normal shots with the shot attribute. | The ship and Doll fire normal shots with the shot attribute. | ||
The shuriken attribute attack occurs when you are holding the Shot button and detached Doll are on an enemy. When that happens, Doll turn green and start to deal contact damage. At the same time, they shoot a spiraling wave of shuriken. | The shuriken attribute attack occurs when you are holding the Shot button and detached Doll are on an enemy. When that happens, Doll turn green and start to deal contact damage. At the same time, they shoot a spiraling wave of shuriken. | ||
| − | When not firing, the ship deploys a shield in front of itself, and Doll also obtain shield attribute. You can deal damage by hitting enemies with the shield (you do not take damage when the ship touches an enemy), but with enough leveling you can reflect enemy bullets and shoot "ref-shots," another shield attribute attack. | + | When not firing, the ship deploys a shield in front of itself, and Doll also obtain shield attribute. You can deal damage by hitting enemies with the shield (you do not take damage when the ship touches an enemy), but with enough leveling you can reflect enemy bullets by the shield and shoot "ref-shots," another shield attribute attack. |
In later stages, you will encounter enemies with attribute barriers. An enemy with such barrier do not take damage unless it gets hit by Megalophaz or attacks with the attribute specified by the color of the barrier. | In later stages, you will encounter enemies with attribute barriers. An enemy with such barrier do not take damage unless it gets hit by Megalophaz or attacks with the attribute specified by the color of the barrier. | ||
| − | + | ==Level-up Mechanic== | |
[[File:Level Display (Illvelo Swamp).jpg|thumb|In-game level display and EXP gauge seen in the bottom left corner of the screen.]] | [[File:Level Display (Illvelo Swamp).jpg|thumb|In-game level display and EXP gauge seen in the bottom left corner of the screen.]] | ||
You can increase the attack power by getting EXP and leveling up each of the attributes. You can get EXP of one attribute by hitting or defeating enemies with attacks with said attribute. You can also get a small amount of shield EXP for deleting enemy bullets with the shield. Oddly enough, you get shot EXP for destroying parts of mid-sized enemies even with shuriken or shield attribute attacks. | You can increase the attack power by getting EXP and leveling up each of the attributes. You can get EXP of one attribute by hitting or defeating enemies with attacks with said attribute. You can also get a small amount of shield EXP for deleting enemy bullets with the shield. Oddly enough, you get shot EXP for destroying parts of mid-sized enemies even with shuriken or shield attribute attacks. | ||
| Line 79: | Line 80: | ||
|} | |} | ||
Leveling up does not only make attacks stronger, but also changes the attacks' properties. | Leveling up does not only make attacks stronger, but also changes the attacks' properties. | ||
| − | For the shot attribute, the fire rate and the shot speed increases and Doll | + | For the shot attribute, the fire rate and the shot speed increases and Doll start shooting more shots in more directions at once. Shuriken slow down on contact with enemies at a very high level. For the shield attribute, refshots get bigger and change their design. |
All attributes start at level 0 and are capped at level 300. At the end of every game, the levels for all attributes and the total level are recorded in rankings. The maximum ship level, 900, is barely reachable. | All attributes start at level 0 and are capped at level 300. At the end of every game, the levels for all attributes and the total level are recorded in rankings. The maximum ship level, 900, is barely reachable. | ||
| − | + | ==Megalomajill, Megalophaz and Megalodoll== | |
[[File:Megalophaz (Illvelo Swamp).jpg|thumb|Megalophaz]] | [[File:Megalophaz (Illvelo Swamp).jpg|thumb|Megalophaz]] | ||
In the bottom right corner of the screen is the Megalomajill gauge. Megalomajill slowly recharges over time, but you have to defeat enemies by non-Megalodoll attacks in order to quickly get Megalomajill. | In the bottom right corner of the screen is the Megalomajill gauge. Megalomajill slowly recharges over time, but you have to defeat enemies by non-Megalodoll attacks in order to quickly get Megalomajill. | ||
| Line 107: | Line 108: | ||
|} | |} | ||
| − | + | == Items == | |
| − | An item spawns when a leader is defeated, or all enemies in a formation of flying enemies are killed, or a middle-sized enemy is destroyed. Items are attracted towards the ship if | + | An item spawns when a leader is defeated, or all enemies in a formation of flying enemies are killed, or a middle-sized enemy is destroyed. Items are attracted towards the ship if they are close to them. |
Item names below are based on ones shown in the logs of the DEV mode in Illvelo Swamp Happy Together. | Item names below are based on ones shown in the logs of the DEV mode in Illvelo Swamp Happy Together. | ||
{| class="wikitable" | {| class="wikitable" | ||
| Line 136: | Line 137: | ||
| [[File:Megalomajill item (Illvelo Swamp).jpg|78px]]||| '''Megalomajill item:''' Instantly fully recharges Megalomajill gauge, enabling Megalodoll or Megalophaz. | | [[File:Megalomajill item (Illvelo Swamp).jpg|78px]]||| '''Megalomajill item:''' Instantly fully recharges Megalomajill gauge, enabling Megalodoll or Megalophaz. | ||
|- | |- | ||
| − | | [[File:Extend item (Illvelo Swamp).jpg|78px]]||| '''Extend item:''' Increases your life count by 1 (up to 5 lives). | + | | [[File:Extend item (Illvelo Swamp).jpg|78px]]||| '''Extend item:''' Increases your life count by 1 (up to 5 lives). If you already have 5 lives, it grants 200000 points. |
|- | |- | ||
| [[File:Random item (Illvelo Swamp).jpg|78px]]||| '''Random item:''' Gives you the effect of randomly chosen one of the 19 items described above. | | [[File:Random item (Illvelo Swamp).jpg|78px]]||| '''Random item:''' Gives you the effect of randomly chosen one of the 19 items described above. | ||
| Line 146: | Line 147: | ||
|} | |} | ||
| + | == Bullets and Hazards == | ||
| + | You do not take damage from touching enemies. At first, enemies do not fire anything and you can focus on map orders very safely. However, as the game progresses, they start to shoot more bullets, especially more hard-to-cancel bullets and some actual dodging becomes a requirement. | ||
| + | Almost all enemy bullets travel no faster than the ship. | ||
| + | In this section, the hazards are introduced along with the weapon that can cancel them.<br><br> | ||
| + | '''Normal shots can cancel:''' | ||
| + | {| | ||
| + | |- | ||
| + | | [[File:Hiragana (Illvelo Swamp).jpg|78px]][[File:Heart Bullet (Illvelo Swamp).jpg|78px]] | ||
| + | || '''Harmless Bullets:''' These bullets were shot by some specific enemies. You do not take damage from them but can still destroy them. | ||
| + | |- | ||
| + | |[[File:Circle(Illvelo Swamp).jpg|78px]] | ||
| + | || '''〇:''' You lose a life when the ship (or its hitbox) touches one of these, so you have to either dodge them or break them. | ||
| + | |- | ||
| + | | [[File:Small Missile (Illvelo Swamp).jpg|78px]][[File:Large Missile (Illvelo Swamp).jpg|78px]] | ||
| + | || '''Missiles:''' Small Missiles (left) fly slowly and have homing properties.<br> | ||
| + | Large Missiles (right) fly straight down fast after slowly spreading around their launch ports.<br> | ||
| + | |} | ||
| + | <br> | ||
| + | '''Shield, Doll and Megalodoll (other than Rolling Doll) can cancel:'''<br> | ||
| + | All enemy bullets described above | ||
| + | {| | ||
| + | |- | ||
| + | | [[File:Normal Bullets (Illvelo Swamp).jpg|234px]]|| '''Normal bullets:''' There are small ones, teardrop-shaped ones, and large ones. | ||
| + | |} | ||
| + | <br> | ||
| + | '''Rolling Doll can cancel:'''<br> | ||
| + | All enemy bullets described above | ||
| + | {| | ||
| + | |- | ||
| + | | [[File:Flame (Illvelo Swamp).jpg|78px]]|| '''Flames:''' Flames are usually hard to cancel in RS34/Milestone games, and only some of the bombs were capable of erasing them before this game. However, they are much easier to deal with in this game thanks to the new Rolling Doll. | ||
| + | |} | ||
| + | <br> | ||
| + | '''Megalophaz can cancel:'''<br> | ||
| + | All enemy bullets described above | ||
| + | {| | ||
| + | |- | ||
| + | | [[File:Molotov Cocktail (Illvelo Swamp).jpg|78px]][[File:Explosion (Illvelo Swamp).jpg|78px]]|| '''Molotov Cocktails:''' A Molotov cocktail can be shattered by any type of weapon, but the resulting pink explosion stays there for a while. This explosion can only be erased by Megalophaz. | ||
| + | |} | ||
| − | + | <br> | |
| − | + | '''Nothing can cancel:'''<br> | |
| + | {| | ||
| + | |- | ||
| + | | [[File:Lasers (Illvelo Swamp).jpg|94px]]|| '''Lasers:''' A few specific enemies and some bosses emit lasers. They do not disappear unless they stop firing or are defeated. | ||
| + | |} | ||
| + | == Map Orders == | ||
| + | One can say the goal of this game is to clear all stages. You clear a stage by surviving for a set amount of time (or defeating the boss if it is a boss stage), but this game has 100 stages and 88 of them are locked at first. To unlock them, you need to clear map orders and get keys.<br> | ||
| + | Each stage has a total of 9 map orders: a gold key order, a silver key order, a bronze key order and 6 sub orders. Clearing a key order rewards you with a key. | ||
| + | You need to pause the game to see the detailed explanation and the exact current progress of the orders, but you can get what they require based on the icons. These icons also have functions as progress bars for their respective orders. | ||
| + | There are orders that require defeating enemies and ones that don't. | ||
| + | ===Defeat Enemies=== | ||
| + | The majority of the map orders, including all key orders, require defeating enemies.<br> | ||
| + | A "defeat enemies" order has up to 3 requirements. Take this order icon for example:<br> | ||
| + | [[File:Defeat Enemies Order(Illvelo Swamp).png|212px]]<br> | ||
| + | The icon means "Defeat ①enemy SF1 (「あの花」, ''lit''. "That Flower") ②leader first ③with the shuriken attribute."<br> | ||
| + | Below is the explanation for each part of the icons. | ||
| + | {| class="wikitable" | ||
| + | |- | ||
| + | ! Explanation !! Example !! What the example icon means | ||
| + | |- | ||
| + | | '''①: What enemies to defeat.''' Most of the time the picture of the enemy to defeat is shown in the center part of the icon. However, sometimes letters like "ALL", "FL", "MID" or "GR" are used instead of enemy pictures. In these cases all, all flying, all mid-sized, or all ground enemies respectively count. ||[[File:MID(Illvelo Swamp).jpg|100px]]|| Defeat mid-sized enemies. | ||
| + | |- | ||
| + | |rowspan="2"| '''②: How you defeat enemies.''' Three icons can come in the bottom left corner of the icon, and their meaning are tied to the three defeat bonus mentioned above in this page.<br> | ||
| + | * Leader badges: Leader First. | ||
| + | * Three blue circles: Formation. | ||
| + | * A blushing stickman: Parts All. | ||
| + | || [[File:FomationSF1(Illvelo Swamp).jpg|100px]]||Defeat enemy SF1 formations. | ||
| + | |- | ||
| + | |[[File:PartsAllM1(Illvelo Swamp).jpg|100px]]||Defeat enemy M1 (「キュウマルニ」, ''lit''. "902") parts-all. | ||
| + | |- | ||
| + | |rowspan="3"|'''③: Attribute/weapon specification.''' An attribute icon, a Megalodoll icon, or even a Megalophaz icon can come in the bottom right corner of the icon, specifying what weapon to defeat the enemies with.<br> | ||
| + | There are some exceptions to this rule. | ||
| + | * If the order is "Defeat enemies with (a type of Megalodoll/Megalophaz)," simply the Megalodoll/Megalophaz icon is shown instead of "ALL" in ① and the Megalodoll icon in ③, possibly to avoid confusion with the USE orders described later. | ||
| + | * In boss stages, silver and gold key orders have "ORDR+''n''" (''n'': a number) in ③. This means "clear ''n'' sub orders." | ||
| + | || [[File:M2withWIDE(Illvelo Swamp).jpg|100px]]|| Defeat enemy M2 (「牛鬼」, ''lit''. "Ushioni") with Wide Doll. | ||
| + | |- | ||
| + | |[[File:ReflectDollOrder(Illvelo Swamp).jpg|100px]]|| Defeat enemies with Reflect Doll. | ||
| + | |- | ||
| + | |[[File:BOSSkeyorder(Illvelo Swamp).jpg|100px]]|| Defeat Midorikun (boss) parts-all and clear 3 sub orders. | ||
| + | |} | ||
| − | + | ===Others=== | |
| − | |||
| − | |||
| − | |||
| − | |||
| − | |||
| − | |||
| − | |||
There are orders that don't require killing enemies. | There are orders that don't require killing enemies. | ||
{| class="wikitable" | {| class="wikitable" | ||
| Line 186: | Line 257: | ||
|- | |- | ||
| [[File:GetHurt(Illvelo Swamp).jpg]]|| '''Get Hurt:''' Requires getting hit by an enemy bullet and lose a life (twice in later stages). <br>Only appears as a sub order in a boss stage. | | [[File:GetHurt(Illvelo Swamp).jpg]]|| '''Get Hurt:''' Requires getting hit by an enemy bullet and lose a life (twice in later stages). <br>Only appears as a sub order in a boss stage. | ||
| + | |} | ||
| + | ==Stages and Sections== | ||
| + | Illvelo Swamp has a dynamic enemy wave system like most of RS34/Milestone games, where once all enemies in a formation/wave disappear (either by being defeated or leaving the screen), the next enemy formation/wave spawns. Multiple enemy wave patterns usually coexist (for example, there could be two sets of flying enemy waves and another two sets of mid-sized enemy waves at the same time), and each stage is defined by these enemy wave patterns and when each of them is activated. | ||
| + | ===Stage Rank=== | ||
| + | If you visit a stage for the first time, you see "RANK ★" along with the stage title. If you get the bronze key and clear the stage, the rank goes up to ★★ the next time you get in. If you get the silver or gold key, the rank will be ★★★. | ||
| + | Generally, when the stage rank goes up, more enemies appear and the leader enemies are relocated so that it is easier to get Leader First bonuses. | ||
| + | In a boss stage (except for stage 99 and 100), the keys you obtain in the stages leading to said boss stage are also taken into consideration, and the rank is ★★★★★ at maximum. | ||
| + | ===Stage Colors=== | ||
| + | As the stages get unlocked and mapped on the world map, routes with different colors emerge. These colors help with identifying stages you need to play for unlocking branches, but they are not purely for distinction. In fact, stages with different colors have different properties, such as item drop rates. | ||
| + | {| class="wikitable" | ||
| + | |- | ||
| + | ! Color | ||
| + | ! Items frequently found | ||
| + | ! Additional explanations | ||
| + | |- | ||
| + | | style="font-weight:bold; background-color:#ff49ff; color:#ffffff;" | Pink | ||
| + | |style="text-align:right;"| [[File:Invinsible_item_(Illvelo_Swamp).jpg|78px]][[File:Extend_item_(Illvelo_Swamp).jpg|78px]] | ||
| + | | These stages are unlocked by default. | ||
| + | |- | ||
| + | | style="font-weight:bold; background-color:#00ff00;" | Green | ||
| + | |style="text-align:right;"| [[File:Shot erase item (Illvelo Swamp).jpg|78px]][[File:Shuriken_level_up_half_item_(Illvelo_Swamp).jpg|78px]][[File:Shuriken_level_up_item_(Illvelo_Swamp).jpg|78px]][[File:Shuriken_level_up_double_item_(Illvelo_Swamp).jpg|78px]] | ||
| + | | Early-game stages. A noticeable amount of key orders have attribute requirements. | ||
| + | |- | ||
| + | | style="font-weight:bold; background-color:#fdaf5d;" | Orange | ||
| + | |style="text-align:right;"|[[File:Shield deploy item (Illvelo Swamp).jpg|78px]] | ||
| + | | These stages have harder enemies for their stage numbers. | ||
| + | |- | ||
| + | | style="font-weight:bold; background-color:#0000ff; color:#ffffff;" | Blue | ||
| + | |style="text-align:right;"|[[File:Score item (Illvelo Swamp).jpg|78px]][[File:Hi-Score item (Illvelo Swamp).jpg|78px]][[File:Sp-Score item (Illvelo Swamp).jpg|78px]] | ||
| + | | You get tons of scores in these stages. | ||
| + | |- | ||
| + | | style="font-weight:bold; background-color:#f9ff0f;" | Yellow | ||
| + | |style="text-align:right;"|[[File:Shot_level_up_half_item_(Illvelo_Swamp).jpg|60px]][[File:Shot_level_up_item_(Illvelo_Swamp).jpg|60px]][[File:Shot_level_up_double_item_(Illvelo_Swamp).jpg|60px]]<br>[[File:Shuriken_level_up_half_item_(Illvelo_Swamp).jpg|60px]][[File:Shuriken_level_up_item_(Illvelo_Swamp).jpg|60px]][[File:Shuriken_level_up_double_item_(Illvelo_Swamp).jpg|60px]]<br>[[File:Shield_level_up_half_item_(Illvelo_Swamp).jpg|60px]][[File:Shield_level_up_item_(Illvelo_Swamp).jpg|60px]][[File:Shield_level_up_double_item_(Illvelo_Swamp).jpg|60px]] | ||
| + | | You get more experience points by defeating enemies in yellow stages. | ||
| + | |- | ||
| + | | style="font-weight:bold; background-color:#740de6; color:#ffffff;" | Purple | ||
| + | |style="text-align:right;"| [[File:Unfortunate item (Illvelo Swamp).jpg|78px]][[File:Shield_level_up_half_item_(Illvelo_Swamp).jpg|78px]][[File:Shield_level_up_item_(Illvelo_Swamp).jpg|78px]][[File:Shield_level_up_double_item_(Illvelo_Swamp).jpg|78px]] | ||
| + | | You need to get a lot of keys in this section to unlock the final section of the red stages. | ||
| + | |- | ||
| + | | style="font-weight:bold; background-color:#ff0000; color:#ffffff;" | Red | ||
| + | |style="text-align:right;height:80px;"|None | ||
| + | | One can say these are "normal" stages. The red stage route is very long, and you unlock it section by section to get to the final stages of this game. | ||
| + | |- | ||
| + | | style="font-weight:bold;background-color:#700143;color:#ffffff;" | Maroon | ||
| + | |style="text-align:right;"|[[File:Megalomajill_item_(Illvelo_Swamp).jpg|78px]] | ||
| + | |Mostly boss stages. An ending cutscene plays after you defeat a boss. | ||
|} | |} | ||
| + | |||
| + | ===Unlocking Stage branches with Required Keys=== | ||
| + | Upon encountering a locked branch, the requirement for unlocking said branch is shown in a kind of cryptic way. | ||
| + | Most of the unlocking conditions are: | ||
| + | * '''Get a certain key in a certain boss stage.''' | ||
| + | * '''Get a certain number of keys in a certain section (consecutive stages) indicated by the color of the text.''' You have to get required amount of keys in one go. | ||
| + | When a branch is unlocked, Cheep'O gives you a message indicating "a lock was opened somewhere" right after the ranking screen. | ||
| + | ===Stage Select=== | ||
| + | You can choose the starting stage from all the stages you cleared. This stage-select feature is useful in several ways, such as choosing the stage at the beginning of the section where you need to obtain the keys to unlock a stage branch. The ship is given a set amount of levels if you start at a specific stage, but they are lower than the levels you could get if you start from stage 1 and get to the selected stage. | ||
== Advanced Strategies == | == Advanced Strategies == | ||
| − | --- | + | There are three categories in the online ranking: the keys collected, the total ship level, and the score. To maximize them, you must start at stage 1 and finish at stage 100.<br> |
| + | Unlike the original Illvelo, the number of keys and the total ship level are unrelated to the score calculation, and a different approach should be taken for each category. | ||
| + | |||
| + | ===Getting a lot of keys=== | ||
| + | You get the most keys if you get through the route with the most stages and collect all the possible keys along the way. The route is the red route, which includes all red stages and has 36 stages in total. You can get 16 keys in each stage, so the maximum amount of keys you can collect in one game of Illvelo Swamp is 576. This route takes over an hour to complete. | ||
| + | The keys in stages 85-97 are not necessary for unlocking the stage branches, and you can consider these as the final challenge. | ||
| + | |||
| + | ===Aiming for level 900=== | ||
| + | Although they kind of bypass a part of the red route, the yellow stages are much better for leveling. The route utilized to get the maximum level is called the yellow route (although most of the stages in this route are red).<br> | ||
| + | However, quickly defeating a lot of enemies alone does not lead to level 900. You get a very little increase in the exp gauge even if you defeated a mid-sized enemy parts-all with Megalodoll above level 230 or so. Even experience worth a quarter of a level is huge at that point. This is where the items come into play. <br> | ||
| + | |||
| + | The red stages do not give you level up items, but they do give random items. There is a good enough chance of a random item having the effect of a level up item. For this reason, you have to pay attention to the random items in later stages. Even the Homing Doll can be useful for spawning many items, but do not use it excessively.<br> | ||
| + | |||
| + | Overall, this challenge tests your skill in utilizing Megalodoll and quickly wiping out enemy formations. | ||
| + | |||
| + | ===Getting a high score=== | ||
| + | The route for the high score is the blue route, which consists of 24 stages. This route is shorter than the red or yellow route, but the 3x score multiplier in blue stages enables higher scores.<br> | ||
| + | Illvelo Swamp's score calculation is based on how you defeat enemies. | ||
| + | The exact score bonus for getting a thumbs-up icon is:<ref>[https://youtu.be/ZGlBLJ2dASw?si=UyB4ertUVS3xCuBb video showcase]. English CC available.</ref><br> | ||
| + | '''Leader First: 10x<br>Formation: 5x ''' | ||
| + | (for the last enemy in the formation) | ||
| + | '''<br>Parts All: 10x'''<br> | ||
| + | This bonus can be combined with the bonus for using Megalodoll (except Homing Doll), which gives you a 3x score multiplier. | ||
| + | For example, if you defeat a mid-sized enemy parts-all with Reflect Doll in a blue stage, you get 10*3*3=90 times the base score of the mid-sized enemy. | ||
| + | It is a good practice to defeat as many mid-sized enemies parts-all with Megalodoll. In order to get a truly high score, you need to learn to aim at parts of mid-sized enemies using Megalodoll, especially Reflect Doll. | ||
== Story == | == Story == | ||
| Line 225: | Line 375: | ||
== References & Contributors == | == References & Contributors == | ||
<small> | <small> | ||
| − | * Information on gameplay mechanics gained by [[User:Moji-love|mojilove]] through playing the game. | + | * Information on gameplay mechanics gained by [[User:Moji-love|mojilove]] and Mirashar through playing the game. |
| + | * [https://w.atwiki.jp/illveloswamp/pages/1.html The Japanese atwiki page] for information on stage unlocking. | ||
</small> | </small> | ||
Latest revision as of 03:19, 19 December 2025
Nintendo Switch game logo
| Developer: | RS34 |
|---|---|
| Music: | Daisuke Nagata |
| Program: | Manabu Matsumoto, Takahiro Kawachi, Hayato Okabe |
| Art: | Daisuke Nagata |
| Release date: | November 18, 2021 |
Illvelo Swamp is a vertically scrolling shoot-em-up developed and published by RS34 for Nintendo Switch in 2021. Like Radirgy Swag, it plays in horizontal orientation, with a slightly angled perspective.
The game's title and general aesthetics draw from the original Illvelo, though this game introduces new mechanics and has a radically different stage structure. There are 100 stages in total (as a reference to the 100 bonus stages in the original Illvelo)
For replay videos, visit the Video Index.
Contents
- 1 Gameplay Overview
- 2 Doll
- 3 Attribute
- 4 Level-up Mechanic
- 5 Megalomajill, Megalophaz and Megalodoll
- 6 Items
- 7 Bullets and Hazards
- 8 Map Orders
- 9 Stages and Sections
- 10 Advanced Strategies
- 11 Story
- 12 Development History
- 13 Version Differences
- 14 Trivia
- 15 Gallery
- 16 Other
- 17 References & Contributors
Gameplay Overview
Illvelo Swamp is a twin-stick, four-button game with one playable ship. The left analog stick is used to control the ship (with uniform speed) in any direction, or with the directional pad in a total of eight directions. The right analog stick can be used to control the detachable Doll (modules) independently from the ship.
Controls
Buttons are configurable in the options menu.
- Shot: Shoots a forward-facing shot
- Doll: Various Doll-related features
- If Doll are docked to the ship : Launches Doll/Activates Megalodoll
- If Doll are detached : (Hold) Moves the Doll in the same direction the ship is moving/(Double tap) Returns Doll to the ship
- If Megalodoll is activated : (Double tap) Deactivates Megalodoll and returns Doll to the ship
- Megalophaz: Generates a circular field around the ship that grants temporary invincibility, absorbs all bullets that touch it, and collects items. Equivalent to a bomb in other games.
- A. Shot: A toggle to turn continuous shot on or off. With this toggle enabled, the ship (and Doll) will continuously shoot as if the shot button is pressed down. This can reduce finger strain for the player.
Also, a shield appears in front of the ship and Doll if the shot button is not pressed for a short time. The shield remains in front of the ship and Doll and absorbs bullets until either the shot button is pressed again.
Doll
Your ship is a modified TRAX called Xenostrepsi. It has a pair of circular modules called Doll. Doll are very useful for defense as Doll delete most hazards upon contact.
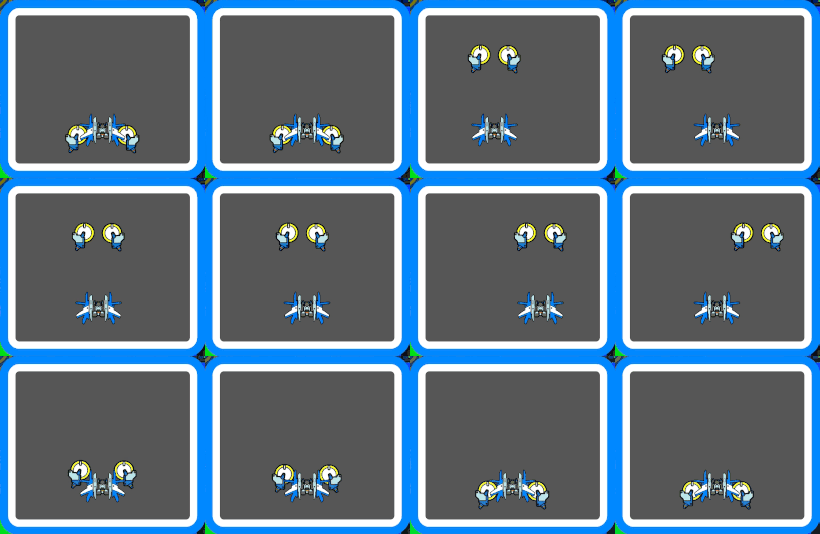
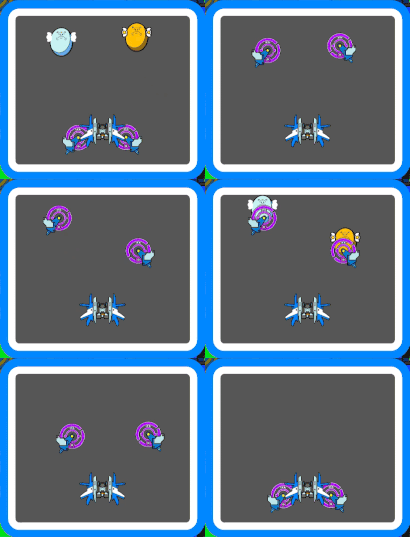
You can detach Doll from the ship by pressing the Doll button. After being detached, Doll launch in the direction the ship is moving or to the front if the ship is not moving. Doll shoot normal shots even when separated from the ship. To move the detached Doll, simply use your right stick. In this way, you can move Doll faster and more freely than the traditional method, which is to hold Doll button and move the ship. The speed at which Doll move can be configured in the Doll settings menu.
Double-tap the Doll button to return Doll to the ship.
Attribute
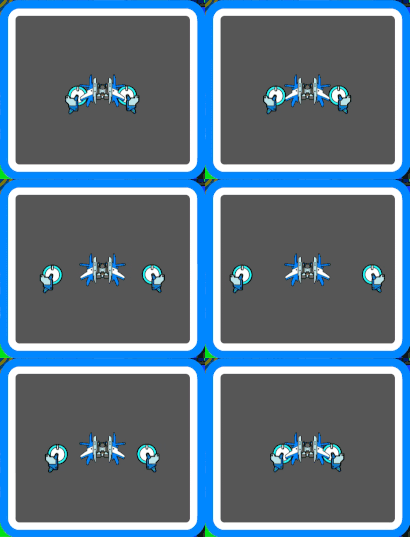
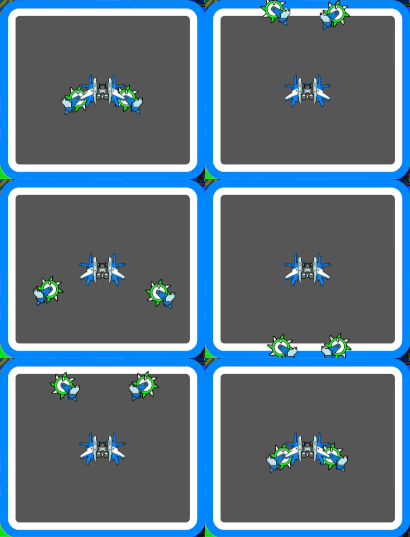
There are three attributes of attack you can perform in this game: shot, shuriken, and shield. The ship and Doll fire normal shots with the shot attribute. The shuriken attribute attack occurs when you are holding the Shot button and detached Doll are on an enemy. When that happens, Doll turn green and start to deal contact damage. At the same time, they shoot a spiraling wave of shuriken. When not firing, the ship deploys a shield in front of itself, and Doll also obtain shield attribute. You can deal damage by hitting enemies with the shield (you do not take damage when the ship touches an enemy), but with enough leveling you can reflect enemy bullets by the shield and shoot "ref-shots," another shield attribute attack.
In later stages, you will encounter enemies with attribute barriers. An enemy with such barrier do not take damage unless it gets hit by Megalophaz or attacks with the attribute specified by the color of the barrier.
Level-up Mechanic
You can increase the attack power by getting EXP and leveling up each of the attributes. You can get EXP of one attribute by hitting or defeating enemies with attacks with said attribute. You can also get a small amount of shield EXP for deleting enemy bullets with the shield. Oddly enough, you get shot EXP for destroying parts of mid-sized enemies even with shuriken or shield attribute attacks. You do not get EXP for destroying enemies with Megalophaz. For efficient leveling, you can get three types of bonuses depending on the type of enemy you destroy.
Leveling up does not only make attacks stronger, but also changes the attacks' properties. For the shot attribute, the fire rate and the shot speed increases and Doll start shooting more shots in more directions at once. Shuriken slow down on contact with enemies at a very high level. For the shield attribute, refshots get bigger and change their design.
All attributes start at level 0 and are capped at level 300. At the end of every game, the levels for all attributes and the total level are recorded in rankings. The maximum ship level, 900, is barely reachable.
Megalomajill, Megalophaz and Megalodoll
In the bottom right corner of the screen is the Megalomajill gauge. Megalomajill slowly recharges over time, but you have to defeat enemies by non-Megalodoll attacks in order to quickly get Megalomajill.
When the gauge is full, you can activate Megalophaz, a bomb in other games. It deals a good amount of damage to the enemies caught in the field it generates.
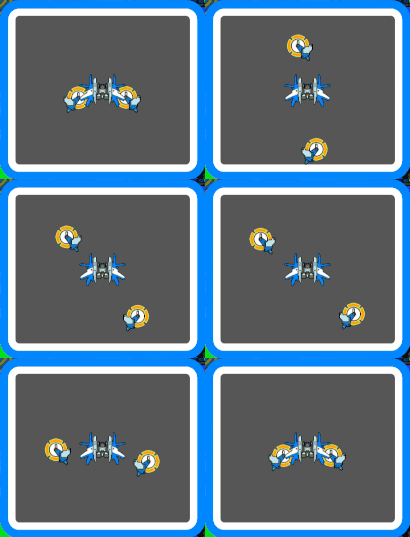
There is another type of special attacks that consume Megalomajill called Megalodoll. If Doll are docked to the ship, you can activate Megalodoll by pressing the Doll button while tilting the right stick.
There are four types of Megalodoll, and you choose which Megalodoll to activate by the direction of the right stick. Three of them have their respective attributes, and the other one has no attributes.
If you activate Megalodoll with the full gauge, it lasts for about 10 seconds without recharging until Megalomajill is depleted. You cannot activate Megalodoll if the Megalomajill gauge is under 20%.
Megalodoll with an attack attribute gives you EXP and score bonuses.
Items
An item spawns when a leader is defeated, or all enemies in a formation of flying enemies are killed, or a middle-sized enemy is destroyed. Items are attracted towards the ship if they are close to them. Item names below are based on ones shown in the logs of the DEV mode in Illvelo Swamp Happy Together.
Bullets and Hazards
You do not take damage from touching enemies. At first, enemies do not fire anything and you can focus on map orders very safely. However, as the game progresses, they start to shoot more bullets, especially more hard-to-cancel bullets and some actual dodging becomes a requirement.
Almost all enemy bullets travel no faster than the ship.
In this section, the hazards are introduced along with the weapon that can cancel them.
Normal shots can cancel:
Shield, Doll and Megalodoll (other than Rolling Doll) can cancel:
All enemy bullets described above
 |
Normal bullets: There are small ones, teardrop-shaped ones, and large ones. |
Rolling Doll can cancel:
All enemy bullets described above
Megalophaz can cancel:
All enemy bullets described above
  |
Molotov Cocktails: A Molotov cocktail can be shattered by any type of weapon, but the resulting pink explosion stays there for a while. This explosion can only be erased by Megalophaz. |
Nothing can cancel:
 |
Lasers: A few specific enemies and some bosses emit lasers. They do not disappear unless they stop firing or are defeated. |
Map Orders
One can say the goal of this game is to clear all stages. You clear a stage by surviving for a set amount of time (or defeating the boss if it is a boss stage), but this game has 100 stages and 88 of them are locked at first. To unlock them, you need to clear map orders and get keys.
Each stage has a total of 9 map orders: a gold key order, a silver key order, a bronze key order and 6 sub orders. Clearing a key order rewards you with a key.
You need to pause the game to see the detailed explanation and the exact current progress of the orders, but you can get what they require based on the icons. These icons also have functions as progress bars for their respective orders.
There are orders that require defeating enemies and ones that don't.
Defeat Enemies
The majority of the map orders, including all key orders, require defeating enemies.
A "defeat enemies" order has up to 3 requirements. Take this order icon for example:
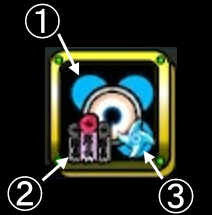
The icon means "Defeat ①enemy SF1 (「あの花」, lit. "That Flower") ②leader first ③with the shuriken attribute."
Below is the explanation for each part of the icons.
Others
There are orders that don't require killing enemies.
Stages and Sections
Illvelo Swamp has a dynamic enemy wave system like most of RS34/Milestone games, where once all enemies in a formation/wave disappear (either by being defeated or leaving the screen), the next enemy formation/wave spawns. Multiple enemy wave patterns usually coexist (for example, there could be two sets of flying enemy waves and another two sets of mid-sized enemy waves at the same time), and each stage is defined by these enemy wave patterns and when each of them is activated.
Stage Rank
If you visit a stage for the first time, you see "RANK ★" along with the stage title. If you get the bronze key and clear the stage, the rank goes up to ★★ the next time you get in. If you get the silver or gold key, the rank will be ★★★. Generally, when the stage rank goes up, more enemies appear and the leader enemies are relocated so that it is easier to get Leader First bonuses. In a boss stage (except for stage 99 and 100), the keys you obtain in the stages leading to said boss stage are also taken into consideration, and the rank is ★★★★★ at maximum.
Stage Colors
As the stages get unlocked and mapped on the world map, routes with different colors emerge. These colors help with identifying stages you need to play for unlocking branches, but they are not purely for distinction. In fact, stages with different colors have different properties, such as item drop rates.
Unlocking Stage branches with Required Keys
Upon encountering a locked branch, the requirement for unlocking said branch is shown in a kind of cryptic way. Most of the unlocking conditions are:
- Get a certain key in a certain boss stage.
- Get a certain number of keys in a certain section (consecutive stages) indicated by the color of the text. You have to get required amount of keys in one go.
When a branch is unlocked, Cheep'O gives you a message indicating "a lock was opened somewhere" right after the ranking screen.
Stage Select
You can choose the starting stage from all the stages you cleared. This stage-select feature is useful in several ways, such as choosing the stage at the beginning of the section where you need to obtain the keys to unlock a stage branch. The ship is given a set amount of levels if you start at a specific stage, but they are lower than the levels you could get if you start from stage 1 and get to the selected stage.
Advanced Strategies
There are three categories in the online ranking: the keys collected, the total ship level, and the score. To maximize them, you must start at stage 1 and finish at stage 100.
Unlike the original Illvelo, the number of keys and the total ship level are unrelated to the score calculation, and a different approach should be taken for each category.
Getting a lot of keys
You get the most keys if you get through the route with the most stages and collect all the possible keys along the way. The route is the red route, which includes all red stages and has 36 stages in total. You can get 16 keys in each stage, so the maximum amount of keys you can collect in one game of Illvelo Swamp is 576. This route takes over an hour to complete. The keys in stages 85-97 are not necessary for unlocking the stage branches, and you can consider these as the final challenge.
Aiming for level 900
Although they kind of bypass a part of the red route, the yellow stages are much better for leveling. The route utilized to get the maximum level is called the yellow route (although most of the stages in this route are red).
However, quickly defeating a lot of enemies alone does not lead to level 900. You get a very little increase in the exp gauge even if you defeated a mid-sized enemy parts-all with Megalodoll above level 230 or so. Even experience worth a quarter of a level is huge at that point. This is where the items come into play.
The red stages do not give you level up items, but they do give random items. There is a good enough chance of a random item having the effect of a level up item. For this reason, you have to pay attention to the random items in later stages. Even the Homing Doll can be useful for spawning many items, but do not use it excessively.
Overall, this challenge tests your skill in utilizing Megalodoll and quickly wiping out enemy formations.
Getting a high score
The route for the high score is the blue route, which consists of 24 stages. This route is shorter than the red or yellow route, but the 3x score multiplier in blue stages enables higher scores.
Illvelo Swamp's score calculation is based on how you defeat enemies.
The exact score bonus for getting a thumbs-up icon is:[1]
Leader First: 10x
Formation: 5x
(for the last enemy in the formation)
Parts All: 10x
This bonus can be combined with the bonus for using Megalodoll (except Homing Doll), which gives you a 3x score multiplier.
For example, if you defeat a mid-sized enemy parts-all with Reflect Doll in a blue stage, you get 10*3*3=90 times the base score of the mid-sized enemy.
It is a good practice to defeat as many mid-sized enemies parts-all with Megalodoll. In order to get a truly high score, you need to learn to aim at parts of mid-sized enemies using Megalodoll, especially Reflect Doll.
Story
Development History
If available, you can include information here about the hardware, the development of the game, and its general reception. Try to have as much information in this section cited as possible.
Version Differences
- Include information here about differences in a game between various versions. This includes regional differences, patch updates/bugfixes, and the like.
Trivia
- Cool facts and random tidbits go here!
Gallery
See (Template Page)/Gallery for our collection of images and scans for the game.
Other
We have support for wikitables, giving us the potential to add lots of cool info in a small box on the page somewhere, but we are not using them at the moment. I'm just leaving this here so we can have it handy in case we decide to actually use them. Feel free to not use this section.
| (Template Page) |
|---|
| put your stuff here |
References & Contributors
- Information on gameplay mechanics gained by mojilove and Mirashar through playing the game.
- The Japanese atwiki page for information on stage unlocking.
- ↑ video showcase. English CC available.
