Strikers 1945 II
Title screen
| Developer: |
Psikyo |
| Music: |
Masaki Izutani |
| Program: |
Shiori Saito
Keisuke Takagi
Kenichi Fujita
Kunihiko Nogomi |
| Art: |
Yoshiyuki Takani |
| Release date: |
1997 |
| Previous game: |
Sol Divide |
| Next game: |
Zero Gunner |
Strikers 1945 II (ストライカーズ1945II) is an arcade game developed and published by Psikyo in 1997. It is the second game in the Strikers 1945 (Series). The first game being Strikers 1945 and later being followed up by Strikers 1999 (Strikers 1945 III). In 1998, the game was also ported to the PlayStation and Sega Saturn.
Gameplay Overview
Each ship has a couple of mechanics to them that are unique to them. They can either have a main shot that is either a Wide shot type or a Forward shot type. These get stronger with each  power up item they pick up. Besides that, every ship has a unique secondary shot they get after picking up power ups. You can increase these up to 4 times. After that, picking up any items will instead just give 4,000 points. Touching flying enemies won't kill the player. Instead they will lose one of their power ups.
Ships will start out with 2  bombs in stock. These vary in functionality between ships. You can hold up to 9 bombs in stock. Picking up any more after that will give 10,000 points instead.
If the player gets hit while holding 5 or 6 bombs, the ship will drop 1 bomb when it dies.
If the player gets hit while holding 7 of more bombs, the ship will drop 2 bombs when it dies.
Attacking enemies and dealing damage also increases your charge meter. After reaching a certain threshold, the player can choose to use a charge shot. Effects differ with each ship.
After all the green bars have been filled, the player can use a LVL 1 charge.
After all the yellow bars have been filled, the player can use a LVL 2 charge.
After all the red bars have been filled, the player can use a LVL 3 charge.
The game will automatically use the highest level charge available. After using one, the meter will be lowered. How much depends on the LVL of the charge that has been used. LVL 1 charges generate the most quickly and can be used very often. LVL 2 charges take a while longer to charge and are usually a lot stronger. LVL 3 charges can take up an entire stage to fully charge, so the player has to make a real effort to get these.

Progression
This game takes place over 8 stages. The first four of which are randomized in order. This is important, because the stages still get progressively more difficult. This is because of the rank system the game has.
After killing the final boss in stage 8, the player gets to see a result screen that grades them on their performace. It judges how fast you cleared each level, how many medals the player has picked up (the timing of the medals is irrelevant) and how many enemies the player has killed. If the player did alright in these areas, they'll receive a silver medal. If the player did it (nearly) flawlessly, they'll recieve a golden medal.
After the results screen is over, the game starts the second loop. In the loop, rank is increased even further, meaning bullets start to get much faster. Most flying enemies will also shoot revenge bullets when they die. Again, the stage order of 2-1 to 2-4 has been randomized, but rank will at this point be maxed out and there is no difference in how these four stages will play.
Controls
- A: Fire the player's Shot weapon. Each ship's shot button has a different function. If the charge meter has reached LVL 1, the player's ship stops shooting and instead will charge a special attack. To keep shooting, the players has to start pressing the button repeatedly to prevent the ship from performing a special attack. Special attacks vary between ships.
- B: Releases a screen-clearing Bomb. Bomb functionality varies between ships.
Ships
DH-98 Mosquito
| DH-98 Mosquito
|
Main Shot
|
Secondary Shot
|
Speed
|
Bomb
|
Charge
|

|
Wide
|
B
|
F
|
S
|
A
|
Overview
- Secondary Shot: Consecutive Rocket Missile
Mosquito shoots missiles directly forward. The amount that can be on screen at one time can be increased by picking up items. The next wave of missiles are ready as soon as the previous ones have hit an enemy or have gone off the screen. Meaning that the closer you are to an enemy, the more often the missiles will shoot.
- Bomb: Mosquito Attackers
A set of bomber planes fly from below to nuke the entire screen, clearing bullets and dealing damage to enemies. After which, a group of smaller planes come forward to shoot enemies and block projectiles. They leave after a few seconds, or if they have been hit a couple of times.
Charge Shot: Royal Napalm
- LVL 1 - The ship will drop a bomb right in front of them, causing a series of explosions that go steadily up the screen, dealing damage to any enemies caught in the explosions.
- LVL 2 - The ship will drop 2 bombs for even bigger damage.
- LVL 3 - The same two bombs now have significantly increased in explosion size and damage.
|
|
Strengths:
- Mosquito has the easiest time speedkilling bosses. If the player sits close to an enemy, the missiles basically keep respawning instantly. This will deal very high damage and quickly kill any large enemies.
- The bombs you get from your charges also deal a lot of damage. Well-placed charges that hit an enemy with multiple explosions help make an already short fight even shorter.
- The bomb is also the best defensive bomb in the game. It both clears the screen of all bullets very quickly and the helper planes make it so the player has a lot room to go towards after using one. Unlike for example Lightning's bomb, which restricts your movement much more.
Weaknesses:
- Mosquito has the lowest movement speed out of all the ships. A very big disadvantage in a game where the player is sometimes forced to dodge fast and random revenge bullets.
- The charges require good timing if the enemy you're trying to hit keeps moving. Something made more difficult by the low movement speed.
- Mosquito in general is a hard ship to get used to. There is a lot of potential, but it requires a lot of very good routing and execution to make him really stand out amongst the other ships.
Top Replay: alcholic - 3,251,100 - 2-ALL (pt1) (pt2) (pt3) (pt4)
SDD-Kaede - 3,001,200 - 2-ALL
|
F5U Flying Pancake
| F5U Flying Pancake
|
Main Shot
|
Secondary Shot
|
Speed
|
Bomb
|
Charge
|
|
|
Wide
|
B
|
S
|
B
|
B
|
Overview
- Secondary Shot: Automatic Laser
Flying Pancake shoots precisely targetted blue lasers at enemies. These move very fast and help clear the screen of any small enemies as soon as they appear. Picking up items increases the amount of lasers that can be on screen at once.
- Bomb: XB-35 Buster Formation
Two large planes together come from the bottom of the screen and start sitting in the middle. They block projectiles and have a homing attack. They will disappear after a few seconds, or after taking a lot of hits.
Charge Shot: Buster Laser
- LVL 1 - From the middle of the ship, Pancake will shoot a laser beam directly forward for a couple of seconds. This beam deals continuous damage for as long as it touches an enemy.
- LVL 2 - Now it will fire 2 beams, but they come from the sides of the ship. This charge also slows down Pancake a bit.
- LVL 3 - Pancake fires a huge beam forward. The ship sits inside this beam and becomes completly invulnerable (both by projectiles, lasers ect.). It also lasts slightly longer.
|
|
Strengths:
- Pancake is the easiest character to learn and use effectively. The secondary shot is essentially a homing weapon. There also aren't many complicated setups that the other characters have with their charges. Definitely the most straight-forward character and considered to be one of the easiest to clear the game with.
- This ship is also very consistent to route the second loop with. It kills any zako enemy relatively quickly so the player has time to dodge the incoming suicide bullets. Having the second-highest speed in the game also helps here.
- It's very effecitve in killing small enemies quickly during boss fights for extra points. In some boss fights, killing an enemy wave quickly makes the next wave appear sooner. Usually Pancake can get a lot of extra waves without any trouble or risk of killing the boss too quickly.
- Pancake's LVL 3 charge can turn even the hardest part in the game to become completely meaningless. It can be used to great effect to do lots of risky strategies in the second loop that benefit both survival and score a lot.
Weaknesses:
- The bomb has to come up the screen before it start to block projectiles, and it doesn't clear all the bullets on screen. Meaning the player has to slighly anticipate using a bomb and press it earlier than some other ships have to. Also, the bombs only block bullets that come from the top of the screen. If there are still any enemies at the bottom, the bomb only helps the second it comes into screen before going to the middle.
- Passive damage (without using any charges) is quite low. The secondary weapon doesn't deal much damage and the wide main shot is only good when getting close to enemies.
Top Replay: WC. - 3,519,100 - 2-ALL (Incomplete replay)
Y.Saito - 3,328,300 - 2-ALL (Live Stunfest 2018)
|
Focke-Wulf Ta152
| Focke-Wulf Ta152
|
Main Shot
|
Secondary Shot
|
Speed
|
Bomb
|
Charge
|

|
Forward
|
B
|
B
|
E
|
B
|
Overview
- Secondary Shot: Giant Rocket Missile
Focke-wulf shoot missiles forward from the middle of it's ship. After picking up 1 item, the ship get two missiles. With each subsequent pickup adds 1 more missile that can be on screen at once. After a missile has hit their target or has left the screen, a new one can be shot.
- Bomb: A9/A10 Rocket
The ship performs a "backflip", during which it is invincible, and huge rocket comes up from below the screen. This rocket blocks all incoming projecticles and deals damage to any enemies it rams over.
Charge Shot: Plasma Mine
- LVL 1 - The ship will create a field right in front of it that blocks all projecticles and also deals a bit damage. After which, it will start to move slowly to the top of the screen.
- LVL 2 - Same as LVL 1, but the size of the field is notably bigger.
- LVL 3 - The field is now much larger. Around 4 times as large as a LVL 2 charge. It also stays right at where it spawned for a few seconds before going very slowly up the screen.
|
|
Strengths:
- Focke-wulf, like Mosquito, is very good at killing large enemies quickly if you can get even a little close to them. Sitting very close (or even on top) of these enemies makes the missiles respawn essentially instantly for great damage. And Fockewulf is also has a straight forward shot so even if sits at the bottom of the screen, he still does decent damage.
- His charge can help out in varies situations. Especially some of the more ridiculous parts in the second loop.
Weaknesses:
- Even with the occasional point blanking, Focke-wulf remains one of the ships with the lowest damage output, if not THE lowest. The charge shot deals basically no damage and in almost all instances only serves as a defense mechanism.
- It's also tricky to kill all enemies as this ship. The speed is alright, but the straight forward shot combined with low damage can make things very tough.
- The rocket bomb is easily the worst bomb in the game. It deals an unimpressive amount of damage and doesn't help much to protect the player. It's off the screen very quickly and only clears a very small portion of it.
- The charge shot only shines in very specific situations (and mostly exclusively in the second loop). The field is only in front of the player for maybe two seconds before it goes up the screen. And there is very little reason to follow it up there.
Top Replay: I.O - 2,792,400 - 2-ALL
|
J7W Shinden
| J7W Shinden
|
Main Shot
|
Secondary Shot
|
Speed
|
Bomb
|
Charge
|

|
Forward
|
E
|
A
|
S
|
S
|
Overview
- Secondary Shot: Heat Missile
Shinden shoots these heat missiles that are shot forward and stick to enemies, dealing continuous damage while in contact. It shoots them in sets of two. Picking up items increases the amount of sets of missiles that can be on screen at once, maxing out at 4 sets (8 missiles). Once the missile is off the screen, it can be fired again.
- Bomb: Ryusei-kai Sweep Bombers
The ship performs a "backflip", during which it is invincible, and six helper ships come to assist the player by forming a shield in front of the player's ship and block projectiles and attack enemies directly in front of them. While they appear, they also clear all the bullets from the screen. These helper ships have very little health and retreat as soon as they are hit a couple of times, or if enough time has passed.
Charge Shot: Samurai Sword Type-98
- LVL 1 - The ship will throws a huge copy of itself forward at high speed, dealing a lot of damage to enemies that it encounters. This copy is slightly bigger than the size of the Shinden.
- LVL 2 - Same as LVL 1, but the damage is much greater now. The size of this copy remains the same.
- LVL 3 - The copy has drastically increased in size and deals even more damage now.
|
|
Strengths:
- Shinden's charge shot is the highest damage dealing charge shot in the game by a notably margin. It is extremely good at taking out large enemies very quickly. It also moves at a high speed so there is very little timing necessary.
- The ship is so fast that the straight forward shot is not a very big deal. And straight forwards shot don't benefit from getting close to enemies, so you can play very safe when you use Shinden.
- The bomb is basically the same as the Mosquito's and just as powerful. It's a good asset both for defense and offense.
Weaknesses:
- Shinden's passive damage (without using charges) falls a bit short compared to some other ships. You really need to use your charges to get through bosses and large enemies quickly. Good management of your charge meter is crucial to playing Shinden well.
- The secondary shot is by far the least useful weapon Shinden has. The shots just don't deal a lot of damage and don't really stick to small enemies or the ones that move around a lot.
Top Replay: M.T - 3,250,100 - 2-ALL
|
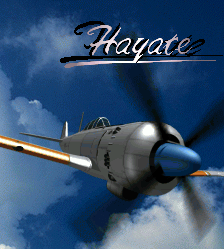
Ki84 Hayate
| Ki84 Hayate
|
Main Shot
|
Secondary Shot
|
Speed
|
Bomb
|
Charge
|
|
Wide
|
A
|
C
|
C
|
S
|
Overview
- Secondary Shot: Syusui Super Rush
Hayate will release options that move towards enemies and stick to them, dealing damage to whichever enemy they have targetted. The amount of options Hayate has is equal to the power up level he currently is. For example, if the player has picked up 2 items, then their ship will have 2 options.
- Bomb: Fugaku Covering Fire
A huge plane comes up the screen directly from below the player's position. This plane blocks incoming projectiles and shoots towards enemies. After absorbing enough damage, or after a couple of seconds, this plane leaves from the top of the screen. This plane is roughly as wide as 90% of the screen.
Charge Shot: Syusui Localized Raid
- LVL 1 - Places one of the Hayate's options directly above the ship. It stays exactly there on screen shooting forward for roughly 10 seconds.
- LVL 2 - Same as LVL 1, but it now uses 2 options and they shuffle places. It deals slighly more damage then two individual LVL 1 charges.
- LVL 3 - Same as LVL 2, but it now uses 4 options. Together they deal slighly more damage than two individual LVL 2 charges.
|
|
Strengths:
- Hayate is a popular survival ship, with his homing options, fast speed and wide shot. His passive damage (without using any charges) at far distances from enemies is among best in the game. So you don't have to learn to get close to enemies to deal high damage, like Mosquito and Focke-wulf.
- The options deal a lot of damage and are quick to react and target incoming enemies.
- Hayate's charges stay on the screen for a long while and deal high damage. Making it easy to kill large enemies quickly.
Weaknesses:
- Hayate's options are unpredictable in which enemy they decide to target if there are many on screen. And will snap from one zako to another really quick. This can be especially troublesome in the loop, where enemies shoot suicide bullets and the player has to make sure no enemy dies from an option while they are sitting close-by.
- The bomb has to come up the screen before it start to block projectiles, and it doesn't clear all the bullets on screen. Meaning the player has to slighly anticipate using a bomb and press it earlier than some other ships have to.
- The hitbox of the bomb is only a little bit larger than it's sprite. So enemies that shoot from the sides rather than from the top of the screen can still get very close to the player.
- The LVL 3 charge is never good enough to save up for. It's just slightly higher damage (which Hayate doesn't need).
Top Replay: HD. - 3,330,300 - 2-ALL
|
P-38 Lightning
| P-38 Lightning
|
Main Shot
|
Secondary Shot
|
Speed
|
Bomb
|
Charge
|

|
Forward
|
B
|
D
|
D
|
A
|
Overview
- Secondary Shot: Homing Missile
Lightning keeps shooting homing missiles. These do not increase in power when picking up Power-up items. After picking up 1 item, the ship get two missiles. After 2, 3 missles. After 3, 4 missiles. And after picking up 4 (maximum), the player gets 6 missiles. After all the missiles have hit their target, a new wave of missiles will be launched the next time the player shoots.
- Bomb: Mustang Attack Formation
The ship performs a "backflip", during which it is invincible, and five helper ships come to assist the player by forming a shield in front of the player's ship and block projectiles and attack enemies directly in front of them. These helper ships have very little health and retreat as soon as they are hit a couple of times, or if enough time has passed.
Charge Shot: Frame Type-II Missiles (One-ton Bomb at LVL 3)
- LVL 1 - The ship will launch two missiles from the sides of the ship directly forward. Upon impact with an enemy, it'll explode and deal damage to all enemies within the area.
- LVL 2 - Same as LVL 1, but the size and damage of them missiles is much greater now. The explosion area is also increased.
- LVL 3 - Now, it fill only shoot one large missle from below the player's ship. This one has a significant increase in damage and explosion size and duration. [Explosion size]
|
|
Strengths:
- Lightning is among the simpliest characters to learn and use. The homing missiles are good for clear zako waves quickly. The forward shot deals a lot of damage to stronger enemies. The charge shot is also easy to use and has an immediate effect.
- The homing missiles make the low ship speed not as big an issue as with some other characters. You don't have to move all over to screen to clear waves of enemies. Only when dealing with large, tankier enemies.
- Pointblanking close to, or on top of enemies, deals notably more damage because of the instantly repeating homing missiles that now spawn continuously.
Weaknesses:
- The speed combined with the straight forward shot makes it hard to kill a large fleet of enemies. The homing missiles help, but only with zako enemies.
- Lightning's bomb can often not be enough to secure your safety. Especially in the second loop, it is common to use multiple bombs to clear a single section of enemies. They helper ships from the bomb have far too little health to safely hide behind them. Their firepower is also nothing noteworthy.
- Aiming the missiles from the charge shot can sometimes be tricky because of the low speed.
- In general, to make good use of Lightning, a lot of routing has to be done and most things have to be done very specifically.
Top Replay: bbb - 2,953,500 - 2-ALL (Replay only contains loop 2)
|
Scoring
Medals
By killing certain ground enemies or destroying scenery, the player can uncover Medals  ⠀that are hidden throughout the game. They are worth points when players pick them up. The value is determined by how close the player is to picking them up when they are glowing. When the sprite is glowing, the medal will be worth 2,000 points. If they are a bit off, it will be worth 1,000 points. If they are even more off, it will be worth 500 points. If it's not close at all, the medal will only be worth 200 points.
Medals are the single biggest source for high scores. One loop contains 134 medals, worth 268,000 points if all of them were to be picked up when they are at their highest value.
Respawn Glitch

In some rare cases, you can do this glitch without revenge bullets.
If the player does not deal enough damage to the boss before they time-out, the boss will explode itself and release revenge bullets. However, all the bullets remain on screen and don't disappear. Normally when a boss is killed, all the bullets from the screen will be removed, but not when it times out.
If the player manages to die right before they would lose control over their ship, they will respawn but won't lose their extend or bombs. But the death animation will still happen and the ship will drop their items (see Gameplay Overview). When the ship respawns on screen, they won't have control and the ship leaves from the top of the screen. If they pick up the items they dropped while on their way, they collect them and recieve any potential score bonuses. It should be noted that by doing this, the player won't recieve points from killing the boss. Meaning this is only worth doing if the score (and or items) are more worth it than just killing the boss before it times out.
The only thing that will reset upon this death is the charge meter, which will be set to have a LVL 1 charge available, the same as if the player would've normally died.
Most bosses (but not all) will not have bullets on screen during the period where the player needs to die. The most common way to perform this glitch is to let the boss time out and kill a zako enemy which will shoot a revenge bullet. Then try to get hit by the revenge bullet when the time is right. The position where you die is also of crucial importance. The items need to be in the right place when the ship respawns and goes up the screen. Remember that you don't have control over the ship when it respawns. Certain enemies, like the Flying Pancake, have an easier time with this trick because they can sit in the right position and have their homing lasers shoot an enemy that might not be in range with the ship's main shot.
An example for how much this trick is worth; if the player has all their bombs in stock when they die, they'll drop 2 items and 2 bombs. Picking up all these items on the way up will be worth 28,000 points. Subtract the amount of score a normal boss kill would've given you (10,000 in most cases), and the result will be how much score you've gained by doing this glitch.
Boss milking
Most bosses will repeatedly spawn zako enemies during the fight (or other unique enemies). The player can decide to keep the boss alive for longer to kill more of these enemies for extra points. In most cases, they'll try to kill the boss just before it times out. Otherwise they miss out on the bonus of killing it, which is always worth more than a couple of extra zako waves.
These zako waves are not always the same. For example, during the fight against Syumi Type-0, the next wave of zako will spawn a few seconds after the previous wave was killed or flew off the screen. Killing these enemies quickly will thus result in more waves. The types of waves and where they come from is also randomized. On the other hand, during the fight against Iron Casket, the enemies will always come in the same formation in a static pattern. These always comes at a set time, regardless of how quickly the previous wave was killed.
Bosses that can be milked include; Syumi Type-0, Graf Zeppelin, Gliath, Iron Casket and Rommel. Cross Sinker also spawns zako enemies, but only in the second loop.
This trick does not include milking enemis that spawn from the player being at low power. That can be done on any boss, but it will override any zako planes that would come on the screen. This is not worth doing for various reasons if the boss spawns zako waves by itself.
Quick killing certain waves of enemies
During stages, there will be certain enemies that keep respawning when you kill one. This doesn't happen very often, each of these instances can be found here: Strikers 1945 II/Notable Scoring Sections
This is not referring to killing zako waves during bosses mentioned in the last section, but it works the same. With the exception that the is no randomness involved.

Waiting for more power up carriers to come on screen.
If the player is at the power level where they have picked up 1 item or none at all, the game will spawn a specific group of zako enemies the next time it can. This group consists of 3 blue ships who are worth 200 points each. Follow by the blue ships, there is a red ship. This one is also woth 200 points, but also drops a item when it's killed. If there is a stretch of gameplay where there are no zako spawning, the player can choose lose their power ups by touching flying enemies to have these waves of enemies spawn. This is mostly done during boss fights that don't have zako coming in during the fight, but there are some exceptions.
It should be noted that if there are items flying on screen, they will prevent more waves of power up carriers spawning.
Max bomb bonuses
Picking up a bomb while already having the maximum amount you can carry (that being 9 bombs), rewards the player with 10,000 points instead. Through the game, 16 bombs will be dropped by enemies (one for each stage). Not including bombs that drop when the player dies. If the player can survive without using bombs, they can start getting these bonuses. They can stack up to 90,000 points in bonuses if the player goes through the entire game without using one.
End bonus
If the player has managed to clear both loops, they will be rewarded a score bonus that depends on how many extends and bombs they have remaining. The amount they get will be:
| End Bonus = 20,000 + (20,000 * Extends remaining) + (10,000 * Bombs remaining)
|
For example, if the player has 3 extends and 9 bombs when clearing (the maximum you can have), they will be rewarded:
End Bonus = 20,000 + (20,000 * 3) + (10,000 * 9) = 170,000 points
If the player has spent all their extends and bombs to clear the game, they will only recieve:
End Bonus = 20,000 + (20,000 * 0) + (10,000 * 0) = 20,000 points
Strategy
While the scoring tricks mentioned so far are mostly used throught the game, there are some specific sections that are worth highlighting.
For more details on these tricks are: Strikers 1945 II/Notable Scoring Sections
Stages

|
⠀⠀
|
N31.5, E128.9 (Japan): East China Sea
|
Target
⠀⠀Syumi Type-0 (Huge Flying Boat)
Midboss
⠀⠀Messerschmitt Me 323 Gigant
|
|
⠀⠀
|
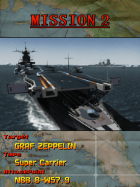
N68.8, W57.9 (North Pole): North Atlantic Ocean
|
Target
⠀⠀Graf Zeppelin (Super Carrier)
Midboss
⠀⠀Nagato
|

|
⠀⠀
|
N36.3, W112.5 (United States of America): Grand Canyon, Colorado River
|
Target
⠀⠀ Gliath (Armored Train)
Midboss
⠀⠀-
|

|
⠀⠀
|
N44.9, E6.2 (France): Saint-Christophe-en-Oisans, Rhône-Alpes
|
Target
⠀⠀ Iron Casket (Battle Airship)
Midboss
⠀⠀Flakturms (Flak towers)
|
|
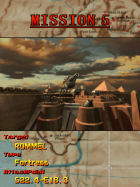
⠀⠀
|
S22.4, E18.3 (Namibia): Kalahari Desert
|
Target
⠀⠀Rommel (Fortress)
Midboss
⠀⠀Landkreuzer P. 1000 Ratte
|
|
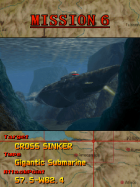
⠀⠀
|
S7.5, W62.4 (Brazil): Madeira Dam
|
Target
⠀⠀Cross Sinker (Gigantic submarine)
Midboss
⠀⠀Karl-Gerät
|

|
⠀⠀
|
S7.5, W62.4 (Brazil): C.A.N.Y. Industrial Site
|
Target
⠀⠀Block-Ade
Midboss
⠀⠀CANNY I or CANNY II, this midboss is decided randomly
|

|
⠀⠀
|
S7.5, W62.4 (Brazil): F.G.R. Headquarters
|
Target
⠀⠀F.G.R. (Huge mechanical alien)
Midboss
⠀⠀B.B.
|
Video References
Replays for this game can be found in this Video Index.


